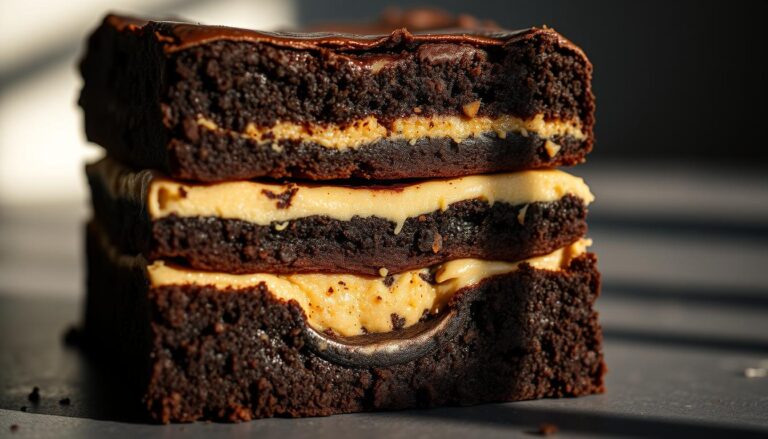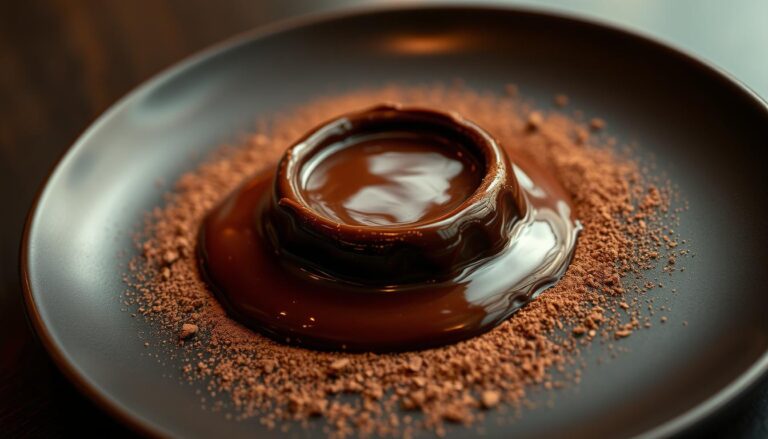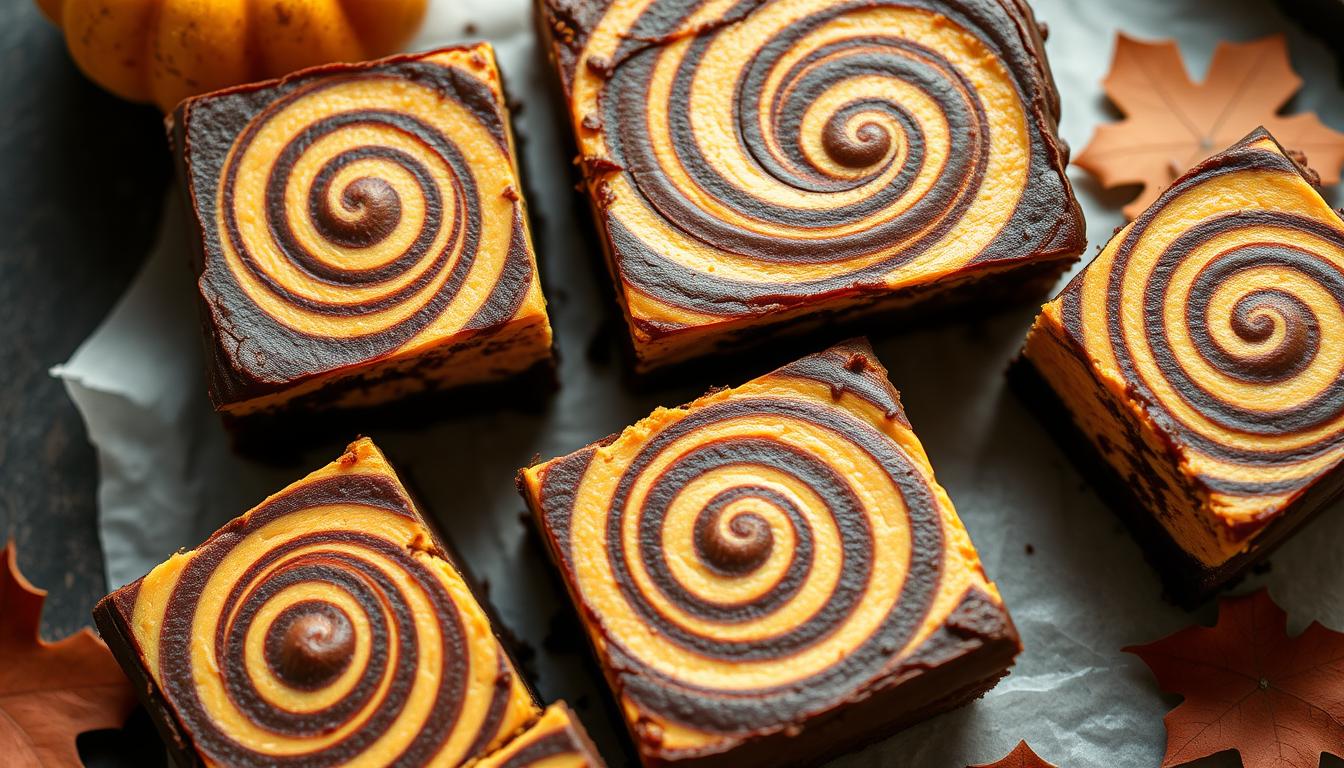
Pumpkin Swirl Cheesecake Brownies with a Chocolate Crust
How about making a delicious, little treat that says: “Autumn is here”. Well that the Pumpkin Swirl Cheesecake Brownies with a Chocolate Crust for sure.
Born from a classic cream cheese brownie base, these treats evolved with seasonal twists.
Warm spices and pumpkin puree add depth without overpowering the rich chocolate layers. The secret? A careful balance that lets both flavors shine.
This recipe creates a marbled masterpiece that’s as beautiful as it is delicious. You’ll love how simple it is to achieve the signature swirl effect.
So, what do you say we get going?
Key Takeaways
- Combines fudgy chocolate and spiced pumpkin in a visually stunning dessert.
- Uses a modified cream cheese brownie base for perfect texture.
- Features layered batter technique for balanced flavor distribution.
- Tested multiple times to ensure ideal consistency and taste.
- Creates professional-looking marbled patterns with simple swirling methods.
- Appeals to both chocolate enthusiasts and pumpkin spice lovers.
Here’s a carefully crafted, precise recipe for Pumpkin Swirl Cheesecake Brownies with a Chocolate Crust — the perfect fall dessert that blends cheesecake creaminess, spiced pumpkin warmth, and fudgy brownie richness:
🍂 Recipe for Pumpkin Swirl Cheesecake Brownies with Chocolate Crust
Ingredients
Chocolate Crust & Brownie Layer:
- 1 cup (125 g) all-purpose flour
- ½ cup (45 g) unsweetened cocoa powder
- 1 cup (200 g) granulated sugar
- ½ cup (100 g) packed light brown sugar
- ½ tsp fine sea salt
- ½ tsp baking powder
- ¾ cup (170 g) unsalted butter, melted and slightly cooled
- 2 large eggs, room temperature
- 2 tsp pure vanilla extract
Cheesecake Pumpkin Swirl:
- 12 oz (340 g) full-fat cream cheese, softened
- ½ cup (100 g) packed light brown sugar
- 1 large egg, room temperature
- 1 tbsp all-purpose flour or cornstarch (to prevent cracking)
- ½ cup (120 g) unsweetened pumpkin puree (blotted with paper towels to remove excess moisture)
- 1 tsp pure vanilla extract
- ½ tsp ground cinnamon (toasted whole stick ground fresh for best flavor)
- ¼ tsp ground nutmeg (freshly grated from toasted nutmeg)
- ¼ tsp ground ginger (toasted and ground)
- ⅛ tsp ground cloves
Instructions
- Prep the Pan:
- Preheat oven to 350°F (175°C).
- Line a 9×9-inch (23×23 cm) baking pan with parchment paper, leaving an overhang for easy lifting later. Lightly grease with butter or spray.
- Make the Brownie Base:
- In a large bowl, whisk together flour, cocoa powder, granulated sugar, brown sugar, salt, and baking powder.
- Stir in the melted butter, egg, and vanilla until smooth and glossy.
- Spread ¾ of the brownie batter evenly into the prepared pan, reserving the rest for topping.
- Make the Cheesecake Pumpkin Swirl:
- In a medium bowl, beat softened cream cheese with an electric mixer until smooth.
- Add brown sugar and beat until fluffy.
- Beat in egg, flour (or cornstarch), pumpkin puree, vanilla, cinnamon, nutmeg, ginger, and cloves until just combined. Do not overmix.
- Assemble:
- Spread the pumpkin cheesecake mixture evenly over the brownie layer.
- Dollop the reserved brownie batter on top in spoonfuls.
- Use a knife or skewer to gently swirl the layers together, creating a marbled effect.
- Bake:
- Bake for 40–45 minutes, or until a toothpick inserted into the center comes out with only a few moist crumbs (not wet batter).
- Cool completely in the pan on a wire rack.
- Chill & Serve:
- Refrigerate for at least 2 hours (overnight preferred) before slicing for neat squares.
- Cut into 16 brownies.
Flavor Notes
- The chocolate crust adds deep richness to balance the tangy cream cheese and warm pumpkin spice.
- Toasting and grinding the spices gives a fresher, more aromatic kick than pre-ground spices.
- The pumpkin swirl is creamy yet spiced, offering a fall-perfect contrast to fudgy brownies.

Introduction to a Fall-Inspired Delight
As leaves turn golden, kitchens come alive with seasonal creations. This dessert captures autumn’s magic through layered flavors that dance on your tongue.
Why You Should Try This Recipe
You’ll create an impressive treat without fancy equipment.
The method focuses on smart layering rather than complex techniques. Three simple steps yield professional-looking results perfect for parties or cozy nights in.
Overview of Flavors and Textures
The base offers deep cocoa richness, while the middle layer brings creamy warmth. A marbled top adds visual drama.
Each component complements the others without competing.
| Feature | Description | Benefit |
|---|---|---|
| Layered Structure | Chocolate foundation + spiced center | Balanced flavor experience |
| Visual Appeal | Artistic swirl patterns | Instantly elevates presentation |
| Texture Contrast | Chewy meets velvety | Satisfying mouthfeel |
You control the swirl intensity: gentle loops or bold patterns.
The spiced element uses just enough warmth to enhance rather than overpower.
Perfect for those who want seasonal flair without overwhelming sweetness.
Essential Must-Have Materials and Tools
Gathering the right components transforms good baking into great results.
Quality items ensure your dessert maintains perfect structure and flavor harmony.
Let’s break down what you’ll need to create those velvety layers and spice-kissed accents.
Key Ingredients for Creamy Filling
Full-fat cream cheese forms the base of your spiced layer.
Opt for brick-style varieties rather than tubs as they whip smoother and hold shape better.
Combine it with unsweetened pumpkin puree (never pie filling) for authentic autumn flavor.
| Ingredient | Purpose | Pro Tip |
|---|---|---|
| Cream Cheese | Creates rich texture | Bring to room temperature first |
| Pumpkin Puree | Adds moisture & color | Blot excess liquid with paper towels |
| Spice Blend | Enhances warmth | Toast whole spices before grinding |
| Brown Sugar | Deepens sweetness | Pack tightly when measuring |
| Flour/Cornstarch | Prevents cracking | Sift for lump-free mixing |
Equipment Checklist
An electric mixer ensures your filling becomes silky smooth.
Use separate bowls for each batter component to maintain distinct flavors until swirling.
An 9×9 metal pan promotes even baking. Glass dishes may require temperature adjustments.
- Sturdy rubber spatula for folding
- Digital scale for precise measurements
- Parchment paper for easy removal
- Instant-read thermometer (optional)

How to Organize Your Kitchen for Success
Efficiency in the kitchen begins with smart preparation. Before mixing your first ingredient, strategic setup ensures smooth execution.
Let’s transform your cooking space into a productivity zone.
Preparing Your Workspace
Clear counters create mental clarity. Start by lining your 9×9 pan with parchment paper, leaving 2-inch handles for easy lifting.
Lightly coat the surface with cooking spray to prevent sticking.
| Step | Purpose | Time Saver |
|---|---|---|
| Microwave Cream Cheese | Softens for smooth blending | 20-30 seconds |
| Group Ingredients | Reduces cross-contamination | 2-minute prep |
| Pre-measure Spices | Prevents measurement errors | 30-second advantage |
Room temperature ingredients mix better. Remove dairy products 30 minutes before baking.
This prevents lumpy batter and ensures even distribution.
Preheating the Oven and Setting the Stage
Consistent heat matters. Set your oven between 325°F and 355°F based on altitude. Use an oven thermometer to verify accuracy.
Create a cooling station with wire racks. Proper airflow prevents soggy bottoms. Clear refrigerator space for chilling. This step locks in texture.

Tips for Achieving the Perfect Texture and Flavor
Perfecting your layered treat requires attention to timing and technique.
Two elements make or break this dessert: maintaining that dreamy fudgy consistency and creating eye-catching patterns.
Let’s explore how to nail both.
Avoiding Overbaking
Remove treats when the center looks slightly underdone as residual heat continues cooking them.
Test at 30 minutes with a toothpick; moist crumbs mean they’re ready. If needed, add 2-3 minute increments to prevent dryness.
Enhancing the Marbled Appearance
Work quickly while the base is warm for smooth patterning.
If the batter thickens, briefly warm the pan in the oven (1 minute) to soften.
Use a butter knife in zigzag motions, avoiding overmixing.
This creates professional streaks without blending layers.
So, there you are, go create something amazing now.
Oh! and if it’s more seasonal brownies your heart desires, then check out our recipe for Chocolate Apple Brownies.
FAQ
Can I use a different type of pan if I don’t have the recommended size?
Yes! Adjust baking time slightly if using a larger or smaller pan. Keep an eye on the edges—they should pull away from the sides when done. A toothpick test also works for checking doneness.
How do I prevent the layers from blending together too much?
Spread the batters evenly and use a knife to create gentle swirls. Avoid overmixing after layering to maintain distinct marbling. Chilling the dessert before slicing helps too.
Can I substitute low-fat cream cheese in the filling?
Full-fat varieties work best for a creamy texture, but low-fat options can be used. Note that the consistency might be slightly less rich, so avoid overbeating the mixture.
How long do these stay fresh after baking?
Store them in an airtight container in the fridge for up to 5 days. For longer storage, freeze slices wrapped in parchment paper for up to 3 months.
What if I don’t have pumpkin pie spice on hand?
Mix 1 tsp cinnamon, ¼ tsp nutmeg, ¼ tsp ginger, and ⅛ tsp cloves. Adjust ratios to match your taste preferences for a warm, aromatic flavor.
Can I add chocolate chips to the batter?
Absolutely! Fold in ½ cup of semi-sweet or dark morsels into the brownie base for extra decadence. Just ensure they’re evenly distributed before adding the filling.