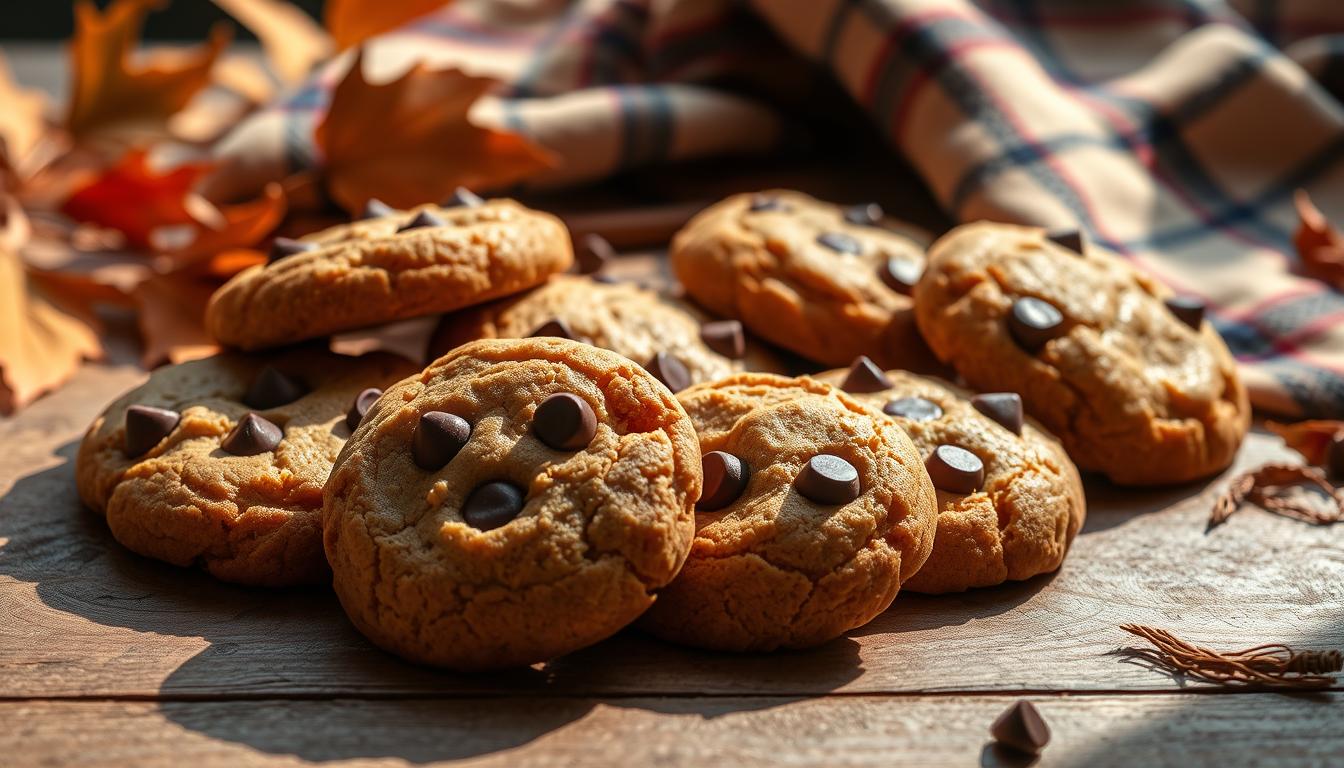
Perfect Pumpkin Chocolate Chip Cookies for a Cozy Fall Day
What’s the perfect treat to cozy up with as the crisp autumn air sets in? For many, the answer is a warm, chewy, and deliciously spiced pumpkin chocolate chip cookie.
This treat combines the comforting warmth of pumpkin pie spice with the richness of dark chocolate chips, all wrapped up in a soft and chewy cookie.
Yum!
In this article, we’ll show you how to make these irresistible cookies that are perfect for snacking, gift-giving, or enjoying with a cup of apple cider.
Let’s get into it.
Key Takeaways
- Discover a beloved seasonal recipe that combines warm spices with rich, melty textures
- Learn why this treat’s soft, cake-like consistency reminds bakers of cherished family traditions
- Understand how simple ingredients create complex flavors perfect for autumn occasions
- Master a versatile recipe that works for holidays, casual gatherings, or cozy nights at home
- Create lasting memories with a crowd-pleasing dessert that adapts to modern baking needs.
🎃 Recipe for Pumpkin Chocolate Chip Cookies
This recipe will help you make soft, chewy cookies that are full of cozy fall flavor.
Yields: about 24 cookies.
🍪 Ingredients:
- 1/2 cup (113g) unsalted butter, melted
- 1/2 cup (100g) granulated sugar
- 1/2 cup (100g) packed light brown sugar
- 1/3 cup (75g) canned pumpkin puree (not pumpkin pie filling)
- 1 tsp vanilla extract
- 1 1/2 cups (190g) all-purpose flour
- 1/4 tsp baking powder
- 1/2 tsp baking soda
- 1/4 tsp salt
- 1 tsp ground cinnamon
- 1/4 tsp ground nutmeg
- 1/8 tsp ground cloves
- 3/4 cup (130g) semisweet chocolate chips
👩🍳 Instructions:
- Preheat Oven
Preheat your oven to 350°F (175°C). Line two baking sheets with parchment paper. - Mix Wet Ingredients
In a medium bowl, whisk together melted butter, granulated sugar, and brown sugar until smooth. Add the pumpkin puree and vanilla extract. Mix well. - Sift Dry Ingredients
In a separate large bowl, sift together flour, baking powder, baking soda, salt, cinnamon, nutmeg, and cloves. - Combine
Gradually mix the dry ingredients into the wet ingredients using a spatula or mixer on low speed until just combined.
Do not overmix. - Add Chocolate Chips
Fold in the chocolate chips evenly. - Scoop Dough
Use a tablespoon or small cookie scoop to drop rounded balls of dough onto the prepared baking sheets, spacing them about 2 inches apart. - Bake
Bake for 11–13 minutes, or until edges are lightly golden and the centers look just set.
Tip: Do not overbake, cookies continue to firm up as they cool. - Cool
Let cookies cool on the sheet for 5 minutes, then transfer to a wire rack to cool completely.
🍂 Pro Tip:
Store in an airtight container at room temperature for up to 4 days or freeze for up to 2 months.
An Introduction to Fall Baking with Pumpkin Chocolate Chip Cookies
Cooler weather invites cozy moments in the kitchen, where familiar aromas spark joy and connection.
This time-honored treat bridges seasonal abundance with shared experiences, offering both comfort and creativity.
Embracing Seasonal Flavors
Autumn’s spice cabinet holds the key to unforgettable desserts.
Cinnamon and nutmeg mingle with earthy puree, while chocolate adds creamy contrast. These layers create depth without overpowering delicate palates.
Balancing warm spices requires precision. Too much ginger brings heat; too little cloves loses complexity.
The magic lies in ratios perfected through generations of taste-testing.
Related article: Check out our recipe to make a delightful Cinnamon Coffee Chocolate Cake.

Gathering Essential Ingredients & Tools
Great recipes start with quality components and reliable equipment.
Selecting the right elements ensures your baked goods turn out just right every time. Let’s explore what you’ll need to create these autumn-inspired treats.
Key Ingredients for a Perfect Blend
Your base begins with all-purpose flour. Unbleached varieties work best for ideal texture.
Measure it using the spoon-and-level method to avoid dense results.
Combine warm spices like cinnamon, ginger, and cloves, or swap them for pre-mixed pumpkin pie spice.
Brown and granulated sugars team up for balanced sweetness. The molasses in brown sugar adds moisture while white sugar creates crisp edges.
Always use plain canned pumpkin puree, never the pie filling version with added spices.
For melty pockets of flavor, semi-sweet morsels are classic. Mini versions distribute more evenly, while milk varieties offer creamier sweetness.
Store extras in an airtight container to maintain freshness.
Must-Have Baking Tools & Tips
Start with two mixing bowls, one for dry ingredients and another for wet.
A sturdy whisk blends flour with leavening agents smoothly. Fold everything together gently using a silicone spatula to keep the batter airy.
Line your sheets with parchment paper to prevent sticking. A medium scoop portions dough evenly for uniform baking.
Let finished treats cool completely on a wire rack – this stops them from becoming soggy underneath.
Pro tip: If your puree looks watery, blot it with paper towels first. This simple step prevents dough from spreading too thin during baking.

Delving deeper into the Cookie Dough
This process combines precision with a touch of intuition, ensuring your mixture becomes the foundation for unforgettable treats.
Follow these steps carefully to nail that signature texture every time.
Preparing and Mixing Your Ingredients
Start by whisking flour, baking powder, and spices in a large bowl.
This blends the dry ingredients evenly, preventing clumps. In a separate bowl, beat sugars with oil until creamy, this creates the base for your dough’s softness.
Crack in an egg and add vanilla, mixing until smooth. Stir in pumpkin puree next, watching the batter turn vibrant.
Slowly pour the flour mixture into the wet ingredients, mixing just until combined.
Overworking here leads to tough results!
Proper Techniques for a Soft, Chewy Texture
Fold chocolate chips into the sticky dough gently.
A rubber spatula works best to keep air in the mixture. Don’t panic if it seems too wet, this moisture bakes into that cake-like crumb you’re after.
Let the dough rest for 10 minutes.
This allows the flour to absorb liquids fully. When scooping, use damp hands to shape portions neatly.
Tips & Tricks for Achieving the Ideal Texture and Flavor
Mastering your technique transforms decent results into bakery-quality creations.
These pro strategies help you control moisture, enhance chewiness, and avoid common pitfalls.
Blotting Pumpkin & Chilling the Dough
Pat your puree dry with paper towels before mixing. This simple step removes excess water, preventing cake-like softness.
Your dough will still feel sticky, that’s normal and essential for tender bites.
Refrigerate the mixture for 30+ minutes. Chilled dough spreads less, creating thicker edges and soft centers.
Let it rest up to 3 days for deeper spice flavors to develop.
Avoiding Overmixing and Ensuring Moisture Balance
Stop stirring once flour streaks disappear.
Overworked dough activates gluten, leading to tough results. Fold ingredients gently using a spatula, think “just married, not blended.”
Swap creamed butter for melted versions. This tweak delivers chewier textures similar to classic chocolate-studded favorites.
For egg-free versions, rely on puree’s natural binding power.
Remember: sticky dough equals moist cookies. Resist adding extra flour, which dries them out.
Use damp hands or a cookie scoop for neat portions that bake evenly every time.
Variations and Substitutions to Suit Your Taste
Your kitchen adventures shouldn’t hit roadblocks because of dietary preferences or pantry shortages.
This flexible formula welcomes creative tweaks while keeping its soul-warming character intact.
Exploring Egg-Free and Butter Alternatives
Swap eggs with ¼ cup unsweetened applesauce per egg for moisture-rich results.
Flax eggs (1 tbsp ground flax + 3 tbsp water) add nutty depth while binding ingredients.
For butter substitutes, coconut oil maintains chewiness, while mashed avocado offers creaminess with healthy fats.
Allergen-friendly? Use sunflower seed butter instead of traditional options.
Just remember: alternative fats might change spreading patterns. Chill dough longer if needed.
Whether adapting for health needs or flavor experiments, these adjustments let everyone enjoy autumn’s signature spice blend.
Embrace substitutions as opportunities rather than limitations. Your personalized version could become someone’s new favorite memory-maker.
After all, the best recipes grow when shared, and then reshaped with care.
Want more cookie recipes?
Then take a look at the Chocolate Chip Cookie with brown butter recipe. It’s our favorite alright!
FAQ
Can I substitute fresh pumpkin for canned puree?
Yes! Roast and blend fresh squash for a richer taste, but blot excess moisture to maintain the dough’s consistency.
How do I prevent my cookies from spreading too much?
Chill the dough for 30 minutes before baking, and ensure your butter isn’t overly softened. Using a cool baking sheet also helps.
What’s the best way to store leftovers?
Keep them in an airtight container at room temperature for up to 4 days. For longer freshness, freeze the dough or baked treats.
Can I make these without eggs?
Absolutely! Replace each egg with ¼ cup unsweetened applesauce or a flaxseed mixture for a vegan-friendly version.
Why is my dough too sticky?
Excess moisture from the puree might be the culprit. Blot it with paper towels or add a tablespoon of flour to balance the texture.
Can I use dark chocolate instead of semi-sweet chips?
Of course! Dark chocolate adds depth, while milk chocolate offers sweetness. Adjust based on your preference for bitterness or creaminess.
Do I need a mixer for the recipe?
A hand mixer works best for creaming butter and sugar, but you can mix by hand—just ensure ingredients are fully incorporated.
How do I achieve a chewy center?
Avoid overbaking. Remove trays when edges are golden but centers look slightly underdone. They’ll firm up as they cool on the sheet.