Classic Chocolate Crinkle Cookies (Soft, Fudgy, and Delicious)
Would you like to make a treat that says “holiday cheer” from the first bite? Then classic chocolate crinkle cookies are just the thing.
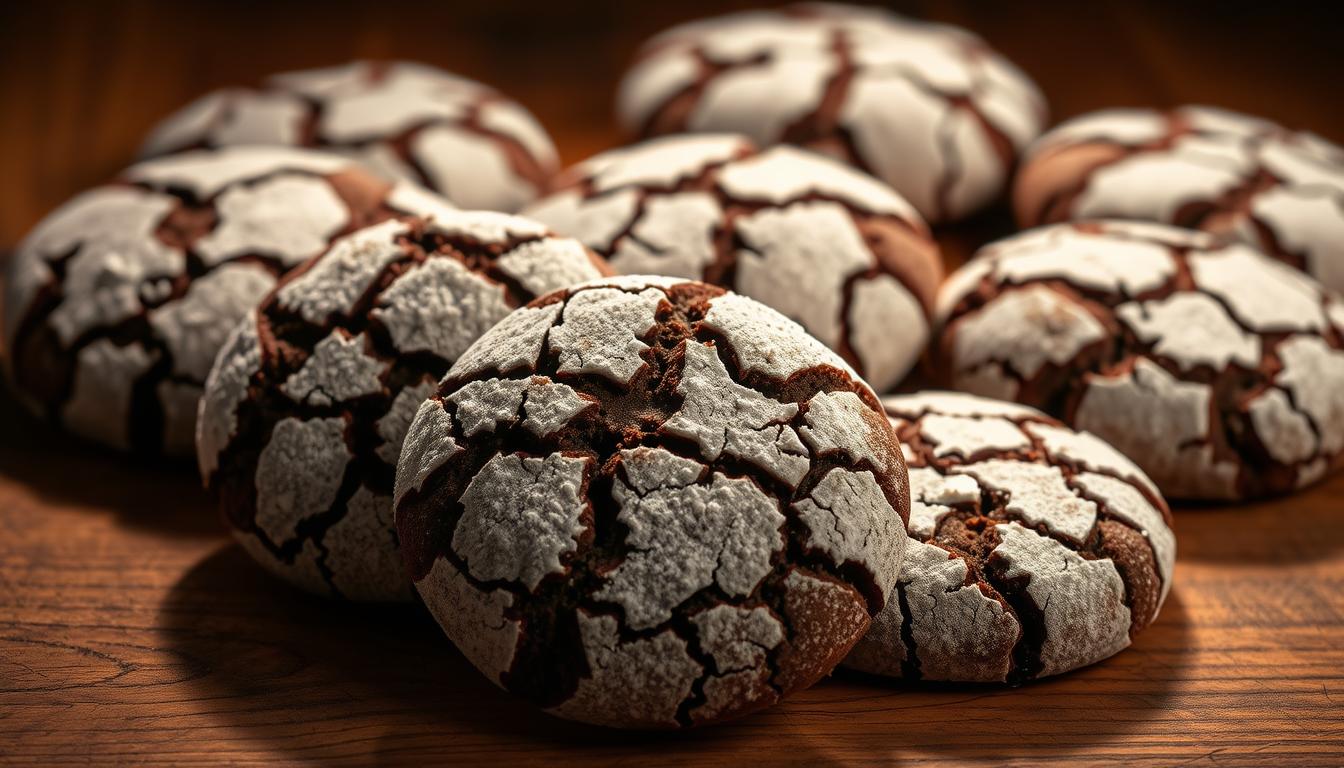
Imagine biting into a soft, fudgy center surrounded by delicate cracks of powdered sugar.
Each bite offering the perfect balance of textures.
These crowd-pleasing delights have earned their spot as a seasonal favorite, with many bakers claiming they’re impossible to resist.
What makes these goodies stand out? Their brownie-like interior stays wonderfully moist, while the exterior develops a crisp, sugary crust during baking.
The signature cracked appearance comes from rolling the dough in confectioners’ sugar before it bakes, creating that iconic snow-dusted look.
Best of all, you don’t need fancy equipment or rare ingredients.
With basic pantry items and straightforward steps, even first-time bakers can achieve impressive results.
Many enthusiasts love preparing the dough ahead of time, making them ideal for busy days when you want freshly baked desserts without the hassle.
Key Takeaways
- Beloved holiday tradition praised for rich, fudgy texture.
- Combines soft centers with crisp, crackly edges.
- Signature powdered sugar coating creates visual appeal.
- Simple techniques suitable for all skill levels.
- Easy to prepare ahead for festive occasions.
Holiday-spirit Chocolate Crinkle Cookies
This is a delicious recipe for making classic Chocolate Crinkle Cookies.
It yields about 24 cookies.
🧾 Ingredients:
- ¾ cup (75g) natural unsweetened dark cocoa powder
- 1 ½ cups (300g) granulated sugar
- ½ cup (120ml) vegetable or canola oil
- 3 large eggs
- 2 tsp pure vanilla extract
- 1 ½ cups (190g) all-purpose flour
- 1 ½ tsp baking powder
- ¼ tsp salt
- ⅔ cup (80g) confectioners’ sugar (for coating)
👩🍳 Instructions
- Mix Wet Ingredients:
In a large bowl, whisk together the cocoa powder, granulated sugar, and oil until it forms a gritty paste.
Add the eggs, one at a time, whisking well after each. Stir in the vanilla extract. - Add Dry Ingredients:
In a separate bowl, whisk together the flour, baking powder, and salt. Gradually mix the dry ingredients into the wet mixture until a sticky dough forms. - Chill Dough:
Cover the bowl with plastic wrap and refrigerate for at least 4 hours, or overnight. This step is essential for easier handling and better crinkle texture. - Preheat Oven:
Preheat your oven to 350°F (175°C). Line baking sheets with parchment paper. - Form Cookies:
Scoop chilled dough into 1-inch balls (about 1 tablespoon each). Roll each ball generously in confectioners’ sugar to coat thoroughly. - Bake:
Place coated dough balls about 2 inches apart on the prepared baking sheets.
Bake for 10–12 minutes, or until the cookies are puffed and crinkled but still soft in the center. - Cool:
Let the cookies cool on the baking sheet for 5 minutes before transferring to a wire rack.
Pro Tips:
- For extra chocolate richness, fold in ½ cup mini chocolate chips before chilling the dough.
- Store in an airtight container for up to 5 days at room temperature.
Oh! and if it is cookies your heart desire, check out our recipe for Butter Chocolate Chip Cookies.
Shop this Recipe
|
Electric Hand Mixer | |
|
Mixing Bowls | |
|
Baking Sheets | |
|
Cookie Scoop | |
|
Wire Rack | |
|
Airtight Containers |
Note: Chocolate Candy Kitchen (CCK) actively partners up with reputable brands to promote useful, quality products.
Some or all of the links above may be affiliate links that generate a small revenue for CCK when you buy through them. Thank you for supporting our blog.

Introduction to Chocolate Crinkle Cookies
Few sweets balance rich flavor and eye-catching design as effortlessly as these powdered sugar-dusted gems.
Their magic lies in simplicity, transforming basic ingredients into a treat that feels both nostalgic and exciting.
Let’s uncover why generations of bakers swear by this recipe.
The Story Behind the Recipe
Home chef Helen Fredell first wowed Betty Crocker with these goodies in the 1950s.
Crocker loved them so much, she featured them in her “Cooky Carnival” book, launching their holiday fame.
Today, they’re as essential to celebrations as twinkling lights.
Tools for Baking
The secret to perfect texture lies in your pantry staples. Each component plays a crucial role in creating that irresistible fudgy center and crisp edges.
Let’s explore what you’ll need to bring this classic treat to life.
Kitchen Tools That Make a Difference
- An electric mixer ensures smooth batter without overworking the flour.
- A cookie scoop guarantees evenly sized portions, which is key for consistent baking.
- Line sheets with parchment paper to prevent sticking and promote golden bottoms.
- Room-temperature eggs blend seamlessly into the batter.
- Measure flour correctly by spooning it into your cup and leveling with a knife.
These small steps separate good results from great ones.

Tips for Rolling and Coating Your Dough
Perfecting the final touches transforms good dough into showstopping treats.
This stage determines both visual appeal and texture, so precision matters.
Let’s explore methods to create uniform shapes and flawless finishes.
Shaping Consistent Portions
Use a #40 cookie scoop (1.5 tbsp) for 1-inch balls. Lightly wet your palms to prevent sticking when rolling.
This trick lets you handle the dough without leaving residue behind.
Chilled mixtures hold their shape better. Work quickly to maintain firmness. Uneven sizes bake at different rates, leading to some burnt edges and underdone centers.
Coating Like a Pro
Roll portions in granulated sugar first for better adhesion. Then coat generously with powdered sugar.
This double-layer method prevents absorption and keeps the exterior crisp.
Only sugar-coat what fits on your baking sheet. Letting prepared balls sit causes the coating to dissolve.
Freshly coated dough expands properly, creating those iconic cracks.
| Coating Method | Result | Best For |
|---|---|---|
| Powdered Sugar Only | Soft crust, subtle cracks | Classic presentation |
| Double-Layer (Granulated + Powdered) | Crisp shell, dramatic splits | Holiday gatherings |
| Cornstarch Blend (1:1 with sugar) | Brighter white finish | Photogenic treats |
Bakers at renowned test kitchens swear by the double-coat technique.
It locks in moisture while creating contrast between the snowy exterior and rich interior. Your creations will look bakery-perfect every time.
Mastering Chocolate Crinkle Cookies Techniques
Your oven becomes the ultimate partner in creating that iconic texture. Precision here separates flat discs from plump, crackled masterpieces.
Let’s unlock the science behind heat management for flawless results.
Preheating, Oven Settings, and Bake Times
Start by setting your appliance to 350°F. Wait until the temperature stabilizes, most models beep or signal when ready.
This ensures even heat distribution from the first minute. Use an oven thermometer if yours runs hot or cold.
Line sheets with parchment paper to prevent sticking. Bake portions for 10-12 minutes.
Check edges at 9 minutes. They should feel firm while centers stay puffed and slightly glossy. Underbaking preserves fudginess.
Achieving Soft, Fudgy Centers with Crisp Edges
If your treats don’t spread by minute 9, act fast. Remove the sheet and gently tap it 2-3 times on your countertop. This “shock” jumpstarts expansion.
Return them to finish baking for 1-2 minutes.
Cool them on sheets for 5 minutes before moving to racks. They’ll deflate slightly, locking in moisture while maintaining structure.
This step prevents collapsed centers or sticky bottoms.
| Stage | Action | Purpose |
|---|---|---|
| Preheating | 350°F full preheat | Activates leavening agents |
| Baking | 10-12 minutes | Sets edges without drying centers |
| Sheet Tapping | Countertop impact | Encourages cracking |
| Cooling | 5-minute rest | Preserves texture contrast |
Troubleshooting Common Baking Issues
Even experienced bakers occasionally face kitchen challenges. Let’s tackle frequent concerns to help you achieve picture-perfect results every time.
Solutions for Flat or Over-Spreading Cookies
If your treats resemble pancakes, check your dough temperature. Skipping the 4-hour chill allows fat to melt too quickly, causing excessive spread.
Work in batches. Keep unused portions refrigerated while shaping others.
Proper flour measurement matters. Too little leads to thin results.
Use the spoon-and-level method: lightly scoop flour into your measuring cup, then scrape off excess with a knife.
How to Tell When Your Cookies Are Just Right
Edges should look set with slight cracks forming by minute 10. Centers appear glossy but not raw. They’ll firm up as they cool.
That gentle deflation you see? It’s your cue for fudgy perfection, not underbaking.
No cracks? Test your baking powder’s freshness by dropping ½ tsp in hot water. If it fizzes vigorously, your leavener works.
If not, replace it. Always preheat ovens fully since cold starts prevent proper rising.
| Issue | Cause | Fix |
|---|---|---|
| Flat shape | Warm dough | Chill longer |
| No cracks | Old baking powder | Replace leavener |
| Burnt edges | Overcrowded sheet | Space 2″ apart |
| Sticky bottoms | Insufficient cooling | Wait 5 minutes |
Creative Variations and Flavor Twists
Unlock new dimensions of flavor by putting your personal spin on this timeless recipe.
Whether you’re craving deeper richness or playful textures, a few tweaks can refresh the classic formula while keeping its soul intact.
Adding Extracts or Espresso for Richer Flavor
Swap vanilla for peppermint or almond extract to create festive twists. A teaspoon of instant espresso powder amplifies the cocoa’s depth without overpowering it.
For citrus lovers, orange zest pairs beautifully with dark flavors.
Experimenting with Different Coating Methods
Try rolling dough in crushed candy canes for a minty crunch or matcha powder for earthy notes.
Colored sanding sugars add vibrant pops, while cinnamon-spiked coatings offer warmth.
These swaps keep every batch exciting, both for the eyes and taste buds.
By the way, if you are looking for more treats with a festive spirit, look into our Homemade Peppermint Bark recipe. I think it’s better than Ghirardelli’s.
You be the judge.
FAQ
Why do I need to chill the dough before baking?
Chilling helps firm up the dough, making it easier to roll into smooth balls. It also prevents overspreading, so your treats hold their shape while baking.
Can I use natural cocoa powder instead of Dutch-processed?
Yes, but Dutch-processed cocoa creates a richer flavor. Natural cocoa works in a pinch, but avoid mixing it with baking soda—it might alter the texture.
How do I keep the powdered sugar from melting during baking?
Roll each dough ball generously in granulated sugar first, then coat heavily in powdered sugar. This double layer helps the snowy finish stay intact.
My cookies turned out flat—what went wrong?
Over-creaming the butter or not chilling the dough long enough are common culprits. Ensure your oven is fully preheated, and use a cool baking sheet for each batch.
Can I freeze the dough for later use?
Absolutely! Shape the dough into balls before freezing. When ready to bake, let them thaw slightly, coat in sugar, and pop in the oven—no need to adjust bake time.
What’s the secret to getting crackly tops?
The contrast between the chilled dough and hot oven creates those signature cracks. Don’t skip the chilling step, and bake at 350°F for perfect fissures every time.
Can I add mix-ins like nuts or chocolate chips?
Go for it! Fold in up to ½ cup of your favorite extras after mixing the dough. Just avoid bulky additions that might prevent proper cracking.
How long do these stay fresh?
Store cooled treats in an airtight container for up to 5 days. For longer freshness, freeze baked cookies—they’ll taste just-baked when thawed overnight.