DIY 3 Musketeers Bars (Fluffy, Whipped Chocolate Center)
Longing for that melt-in-your-mouth chocolate experience from childhood? Then you’ve come to the right place since here you’ll find a recipe to a DIY 3 Musketeer Bar,
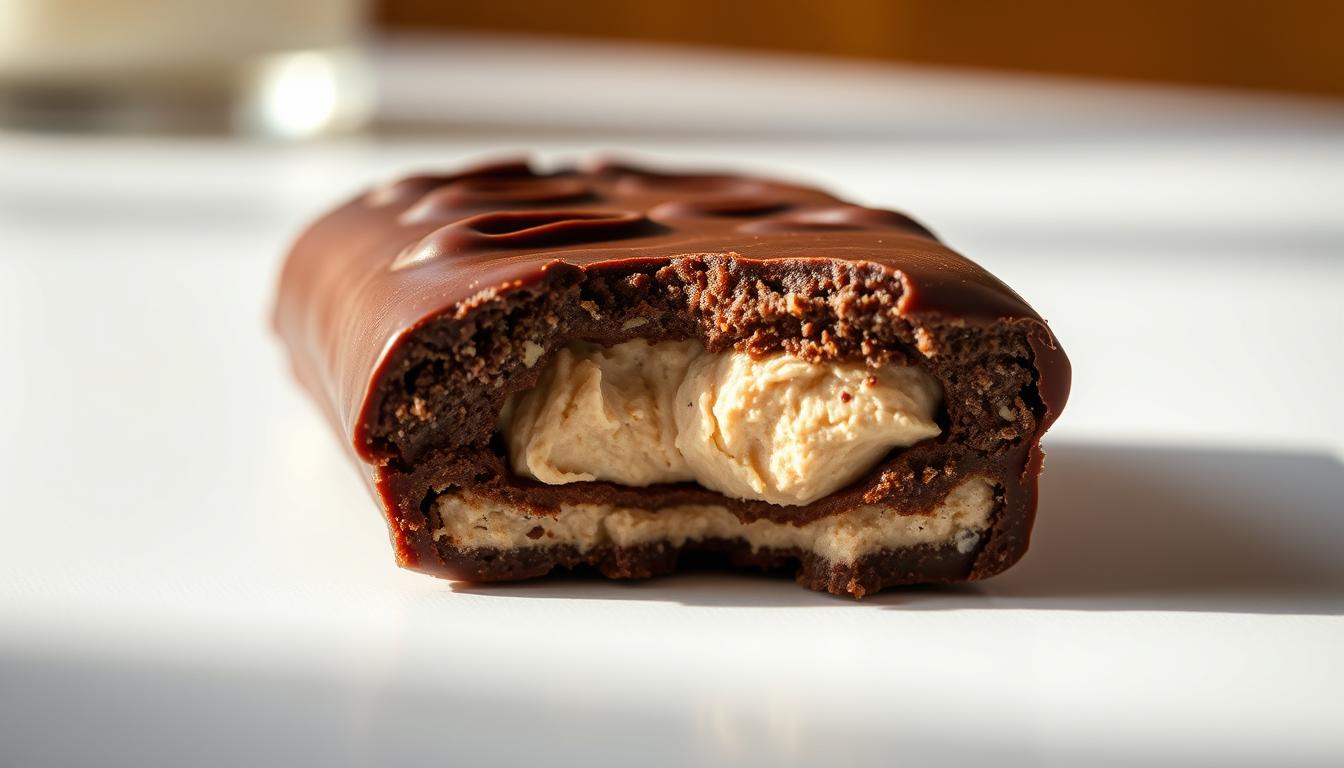
Imagine biting into a cloud-like center wrapped in smooth, rich chocolate, all made in your kitchen.
This homemade version of the classic candy captures everything you love about the original, with a texture so light it practically floats off the wrapper.
So, let’s get the show on the road, what say you?
Key Takeaways
- Recreate the iconic fluffy chocolate center of store-bought candy with minimal ingredients
- Customize textures by freezing or storing bars at room temperature
- Ideal for gifting or special occasions due to its crowd-pleasing appeal
- Requires no advanced cooking skills—beginners can achieve great results
- Swap coatings or add mix-ins to make the recipe uniquely yours
Making your very own 3-Musketeer Bar
Here’s the recipe for DIY 3 Musketeers Bars that will closely resemble the experience you get from the store-bought version.
Yields about: 16 soft, fluffy, chocolatey center coated in rich milk chocolate bars.
Ingredients
- 2 cups (340g) milk chocolate chips (for filling)
- 1 ½ cups (90g) marshmallow creme (such as Marshmallow Fluff)
- 1 tsp vanilla extract (optional, enhances flavor)
- 2 ½ cups (425g) milk chocolate chips (for coating)
- 2 tbsp (28g) vegetable shortening or coconut oil (for coating)
Instructions
Prepare the Chocolate Nougat Center
- Line an 8×8-inch square pan with parchment paper. Set aside.
- In a microwave-safe bowl, melt 2 cups milk chocolate chips in 30-second intervals, stirring between each, until smooth.
- Quickly stir in 1½ cups marshmallow creme and vanilla extract (if using) while the chocolate is still warm. Mix vigorously until fully combined and fluffy.
- Spread the mixture evenly into the prepared pan. Smooth the top with a spatula.
- Freeze for 30–40 minutes, or until very firm.
Cut and Shape
- Once firm, lift the nougat slab out of the pan using parchment paper.
- Use a sharp knife to cut into bars or squares (about 1×3 inches for traditional shape).
- Return the cut bars to the freezer while you prepare the coating.
Coat the Bars
- In a clean microwave-safe bowl, melt 2½ cups chocolate chips with 2 tbsp shortening in 30-second intervals, stirring until smooth and glossy.
- Dip each frozen bar into the melted chocolate, using a fork to coat and shake off excess.
- Place coated bars on a parchment-lined tray.
Final Touch
- Let the chocolate set at room temperature for 1 hour or refrigerate for 20 minutes.
- Store in an airtight container in the fridge for up to 1 week (or freeze for longer shelf life).
And if you are into making your own versions of popular treats, take a look at our recipe for homemade Milky Way bars.

Essential Tools
Creating these cloud-like chocolate treats starts with gathering practical kitchen gear.
Whether you prefer a quick version or professional-grade results, flexibility remains key for achieving that perfect balance of airy filling and crisp coating.
Required Kitchen Equipment & Tools
Your standard kitchen setup works perfectly here.
Microwave-safe bowls handle melting tasks, while an 8-inch square pan shapes the filling.
A candy thermometer ensures precise temperatures for professional batches. For clean cuts, use a ruler and sharp knife after freezing.
No planetary mixer? A sturdy spatula folds ingredients just as effectively.
Chocolate dipping forks create smooth coatings, but regular forks work in a pinch. Parchment paper becomes your best friend for mess-free handling.
Tips for Achieving the Perfect Fluffy Texture
Perfecting the airy center of your homemade treats requires mastering two key elements: temperature management and mixing methods.
Let’s break down the techniques that ensure your creation stays light yet stable from bowl to freezer.
Temperature Control and Cooling Techniques
Cool your melted chocolate completely before folding it into the cool whip. Rushing this step causes the whipped topping to collapse, losing its cloud-like structure.
Let the chocolate sit for 15-20 minutes. It should feel lukewarm, not hot, to the touch.
If the mixture develops tiny chocolate bits during mixing, keep folding gently. These will blend into the cool whip as you work.
Freeze the combined mixture for exactly 30 minutes before cutting—this creates firm bars that hold their shape during dipping.
Mixing Tips for a Consistent Texture
Use a folding motion with a silicone spatula to combine ingredients. Stirring aggressively deflates the air bubbles in the cool whip that create the signature fluffiness.
Stop mixing once no white streaks remain—overworking makes the texture dense.
Test the mixture’s readiness by scooping a spoonful. It should hold its shape briefly before slowly melting.
If it’s too soft, chill for another 30 minutes. Properly whipped candy centers feel light yet stable, like chocolate-flavored marshmallow cream.

Variations and Substitutions in your DIY 3 Musketeer Bar
Transform your homemade confections into personalized masterpieces by exploring different chocolate bases and imaginative mix-ins.
The beauty of crafting your own treats lies in tailoring flavors and textures to match your cravings or surprise your guests.
Exploring Chocolate Foundations
Swap milk chocolate chips for dark chocolate chips to intensify the flavor with rich, bittersweet notes.
White chocolate chips create a sweeter foundation that pairs beautifully with fruit-infused whipped toppings.
Both options maintain the candy’s signature airy texture while offering distinct taste experiences.
Flavor-Boosting Mix-Ins
Stir peanut butter into the whipped center for a creamy twist that satisfies nutty cravings.
Crushed almonds or pecans add satisfying crunch when folded into the chocolate mix.
For festive occasions, roll finished bars in sprinkles or drizzle with contrasting melted chocolate.
Experiment with extracts like mint or orange to create refreshing flavor combinations.
A pinch of sea salt elevates sweet profiles, while cinnamon adds warmth to autumn-inspired batches.
These simple adjustments let you craft unique versions that become your signature candy.
Presentation, Serving, and Storage Suggestions
Showcase your handcrafted chocolate delights like a pastry pro with these presentation and preservation techniques.
Thoughtful styling and proper storage keep your treats looking sharp and tasting fresh for weeks.
Creative Presentation Ideas
Transform simple squares into edible art by drizzling bars with leftover melted chocolate.
Use a squeeze bottle to create zigzag patterns or swirls for professional flair. Add colorful sprinkles immediately after dipping while coatings remain tacky.
Arrange pieces on a marble slab or vintage tray for visual contrast. Stack them in clear gift boxes with parchment layers between rows.
The square baking pan ensures uniform shapes that fit perfectly in decorative tins.
Proper Storage for Longevity
Preserve that airy texture by placing candy in freezer bags or airtight containers. Freezer storage maintains optimal quality for up to 3 months.
For room temperature serving, let bars sit 10 minutes after removing from cold storage.
| Storage Method | Temperature | Duration | Texture |
|---|---|---|---|
| Freezer Bags | 0°F | 3 months | Crisp exterior |
| Airtight Container | Room Temp | 2 weeks | Softer center |
| Parchment Layers | Fridge | 1 month | Firm but sliceable |
Always use a lined pan when freezing batches as it prevents sticking and simplifies removal.
Set aside dedicated freezer space to protect delicate chocolate coatings from getting bumped or scratched.
Homemade Dessert gets on a whole new level.
Your kitchen adventures now yield creamy, meltaway confections that redefine homemade candy.
This recipe turns everyday ingredients into bite-sized magic, airy centers hugged by velvety chocolate shells.
Friends won’t believe you whipped up these professional-quality treats without fancy equipment.
Customization makes this creation shine. Swap milk chocolate chips for dark varieties, or add nutty swirls to the whipped filling.
The recipe adapts effortlessly to holidays, bake sales, or midnight cravings. Store extras in freezer bags for spontaneous sweet moments.
What sets these candies apart? You control the quality. Skip preservatives while keeping that iconic fluffy texture.
Dip bars in melted chocolate for glossy finishes, or drizzle patterns for artistic flair. Each batch proves gourmet results require passion, not complexity.
Share your creations as edible gifts or serve them at parties.
Either way, expect requests for the secret behind your cloud-like chocolate squares.
Keep the recipe handy. As this is one of the childhood chocolate treats that will keep people coming back for more.
FAQ
Can I use dark chocolate instead of milk chocolate for coating?
Absolutely! Swap milk chocolate chips with dark or semi-sweet varieties for a richer flavor. Just melt them slowly to avoid seizing, and adjust sweetness if needed.
How long should the whipped center freeze before cutting?
Freeze the mixture for at least 45–60 minutes. It should feel firm but not rock-hard, making it easy to slice into clean bars without crumbling.
What’s the secret to keeping the center fluffy?
Fold the whipped topping gently into the melted chocolate mix. Overmixing deflates the air bubbles, so stop once no streaks remain and the texture looks smooth.
Can I add nuts or other mix-ins to the filling?
Yes! Stir in crushed peanuts, sprinkles, or mini marshmallows after combining the base. Keep additions small to maintain the signature light texture.
How do I prevent the chocolate coating from cracking?
Let the frozen centers sit at room temperature for 2–3 minutes before dipping. This reduces temperature shock, helping the melted chocolate adhere smoothly.
How long do homemade versions stay fresh?
Store them in an airtight container in the freezer for up to 2 weeks. Separate layers with parchment paper to avoid sticking, and thaw slightly before serving.