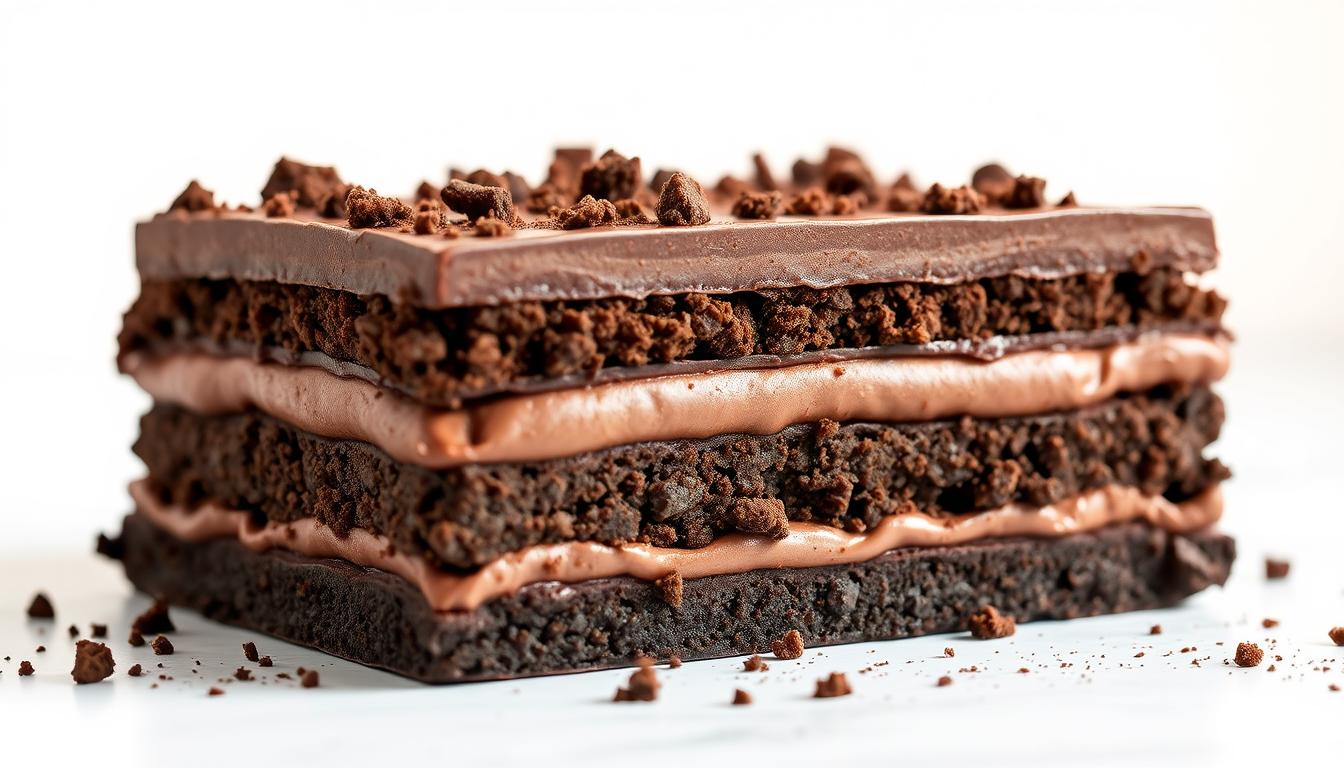
No-Bake Chocolate Lasagna (The Ultimate NYE Potluck Dessert)
Want to create a dessert that looks like it took hours to make, but actually requires zero baking and minimal effort? Then check out our Chocolate Lasagna,
This no-bake layered treat will transform your potluck game.
Imagine rich, creamy layers stacked perfectly in a pan. Each bite delivers incredible texture and flavor.
Your friends will think you spent all day in the kitchen.
The best part? You only need about 20-40 minutes of prep work. No oven required!
This makes it perfect for busy hosts. You can focus on other party preparations while your masterpiece sets.
This crowd-pleaser combines crushed cookies, smooth pudding, and fluffy toppings.
It’s budget-friendly and feeds many people. Whether for New Year’s Eve or any gathering, this dish always disappears fast.
In the next minutes you’ll learn simple techniques for perfect layers and how to prevent sogginess.
Get ready to become the potluck hero with this unforgettable sweet creation.
Key Takeaways
- Create an impressive dessert without any baking required.
- Perfect for New Year’s Eve parties and potluck gatherings.
- Only 20-40 minutes of prep time needed.
- Uses simple ingredients available at any grocery store.
- Features multiple layers of texture and flavor.
- Ideal for feeding large crowds on a budget.
- Earn rave reviews with this crowd-pleasing treat.
Chocolate Lasagna (No-Bake Treat Perfect for New Year’s Eve Potlucks)
Here is the potluck-ready recipe for a No-Bake Chocolate Lasagna that is creamy, layered, chocolatey, and always a crowd-pleaser.
To top it off, there’s no baking required, what else could you ask for?
Ingredients
Oreo Crust
- 36 Oreo cookies (regular, not Double Stuf)
- 6 tablespoons (84 g) unsalted butter, melted
Cream Cheese Layer
- 8 oz (225 g) cream cheese, softened
- 1 cup (120 g) powdered sugar, sifted
- 1 teaspoon vanilla extract
- 1 cup (240 ml) whipped topping (like Cool Whip), softened
Chocolate Pudding Layer
- 2 boxes (3.9 oz each) instant chocolate pudding mix
- 2 ¾ cups (650 ml) whole milk
Final Topping
- 2 cups (480 ml) whipped topping, softened
- Optional: chocolate shavings, mini chocolate chips, or crushed Oreos for garnish
Instructions
Make the Oreo Crust
- Add the Oreo cookies (cream included) to a food processor and pulse into fine crumbs.
If doing by hand: place cookies in a bag and crush with a rolling pin until sandy. - Transfer crumbs to a bowl and mix in the melted butter until fully coated.
- Press the mixture firmly into the bottom of a 9×13-inch (23×33 cm) dish.
- Place in the refrigerator for 15 minutes to firm up.
Prepare the Cream Cheese Layer
- In a medium bowl, beat the softened cream cheese until completely smooth.
- Add the sifted powdered sugar and vanilla extract, beating until light and creamy.
- Fold in 1 cup whipped topping gently until well combined.
- Spread this layer evenly over the chilled Oreo crust.
- Refrigerate while preparing the pudding layer.
Make the Chocolate Pudding Layer
- In a large bowl, whisk the instant chocolate pudding mixes with 2 ¾ cups whole milk.
- Whisk for 2 minutes, then let the pudding sit for 5 minutes to thicken.
- Spread the thickened pudding carefully over the cream cheese layer.
Add the Final Whipped Topping Layer
- Spread 2 cups whipped topping evenly over the pudding layer.
- Garnish with chocolate shavings, mini chips, or crushed Oreos if desired.
Chill and Serve
- Refrigerate the assembled chocolate lasagna for at least 4 hours, or ideally overnight for the cleanest slices.
- Slice into squares and serve chilled.

Recipe Overview and Inspiration
The original inspiration came from Olive Garden’s famous creation.
Their version featured stacked brownies with creamy frosting and chocolate sauce. Food lovers adored this rich tower of goodness.
When the restaurant stopped serving it, home cooks began re-creating their own versions.
This sparked a wave of homemade adaptations that became family favorites.
In the 80s and 90s, similar desserts appeared under names like “chocolate lush.”
These no-bake creations quickly became potluck staples across the country.
| Feature | Olive Garden Version | Homemade Adaptation | Benefits |
|---|---|---|---|
| Preparation | Restaurant-made | Easy home preparation | Customizable to taste |
| Availability | Discontinued | Always available | Make anytime |
| Ingredients | Fixed recipe | Flexible substitutions | Use what you have |
| Serving Size | Individual portions | Feeds crowds | Perfect for parties |
Why This Dessert Works Perfectly for NYE Potlucks
New Year’s Eve gatherings demand practical food choices. This no-bake option saves precious oven space when everyone prepares hot dishes.
You can make it ahead and transport it easily. The dessert scales beautifully for large crowds without complicated adjustments.
Both children and adults adore these layered creations. You’ll consistently return home with an empty pan, proving its crowd-pleasing power.
The impressive presentation suggests hours of work, but you achieve maximum impact with minimal effort. This makes you the potluck hero every time.
Raw Materials and Preparations
Your journey to potluck fame begins with these carefully selected, easy-to-find ingredients.
Getting them ready correctly is the secret to a perfect, no-fuss dessert.
Each component plays a specific role in building the final masterpiece. Let’s break down what you need and why it matters.
Key Ingredients: From Cream Cheese to Oreo Crust
The foundation is a crisp oreo crust. You’ll need one package of regular oreos, about 36 cookies. Crush them finely and mix with 6-8 tablespoons of melted butter.
This buttery base holds everything together without being too thick.
Next comes the creamy layer.
Use 8-16 ounces of softened cream cheese. Let it reach room temperature to avoid lumps.
Blend it with 1/2 to 1 cup of sifted powdered sugar and some vanilla.
For the pudding, use two boxes of instant mix. Whisk them with 2 1/4 to 2 3/4 cups of cold whole milk.
The cold milk helps it set quickly and firmly.
The final touch is a fluffy layer of whipped topping. An 8-ounce container works perfectly.
Ingredient Substitutions and Measurement Tips
You can make smart swaps if needed. Try different cookies for the crust, like chocolate chip varieties.
Always use unsalted butter. This lets you control the salt level in your dessert. For the cream cheese mixture, sifting the powdered sugar prevents any lumps.
Stick with whole milk for the pudding.
Low-fat milk can sometimes cause colors to bleed if the dessert sits too long. These small tips make a big difference in your final creation.

Building the Layered Chocolate Lasagna
The assembly process transforms simple ingredients into an impressive layered masterpiece.
You’ll create distinct strata that hold their shape beautifully when sliced.
Step-by-Step Layering Process
Begin by crushing your cookies in a food processor until you get fine crumbs.
Set aside one tablespoon for the final garnish. Mix the remaining crumbs with melted butter until the mixture holds together.
Press this crust firmly into your prepared pan. Use the bottom of a glass for even pressure.
Chill the base in the freezer for five minutes while you prepare the next component.
Assembling the Brownie, Cream, and Pudding Layers
Beat cream cheese until fluffy, then incorporate powdered sugar and vanilla.
Gently fold in whipped topping to create a light filling. Spread this evenly over your chilled crust.
Refrigerate for ten minutes to set the layer. Prepare your pudding mixture with cold milk in a clean bowl. Spread the creamy pudding over the set cream cheese layer.
After another brief chill, add the final whipped topping.
Sprinkle with reserved crumbs and garnish. Your creation needs at least two hours in the refrigerator for all layers to firm up properly.

Mastering the Art of Texture and Presentation
The true magic of this dessert happens when you master the balance between creamy textures and crunchy elements.
Perfecting this contrast turns a simple recipe into an unforgettable experience.
Your technique during assembly makes all the difference.
A few simple tricks ensure every layer stays distinct and delicious.
Tips for Achieving the Perfect Creamy and Crunchy Balance
Start with a solid foundation. Always grease the pan’s bottom well before pressing in your cookie crust.
A quick chill in the freezer firms it up, preventing sogginess from the wet layers on top.
For the creamy cheese filling, gentle folding is key. Use a soft motion when combining whipped cream with the cream cheese mixture. This keeps the filling light and airy.
Presentation is just as important as taste. For a stunning top layer, create elegant chocolate shavings.
Chill your chocolate bar first, then use a vegetable peeler for perfect curls.
Transfer the shavings with a spoon to avoid melting them with your fingers. This adds a delicate crunch and beautiful finish.
Follow these essential steps for the best results:
- Chill each layer adequately in the refrigerator to prevent bleeding and create clean, defined slices.
- For perfect cuts, slightly freeze the dessert before slicing. Wipe your knife clean after each piece.
- Serve your creation within 48 hours for optimal texture and to maintain vibrant layer colors.
These small details elevate your dessert from good to extraordinary. You’ll create a visually stunning treat that tastes incredible.
Customizing Your Chocolate Lasagna
The real fun begins when you start experimenting with different flavor combinations and decorative touches.
This versatile dessert becomes uniquely yours through simple creative choices.
Variations Using Different Cookies and Toppings
Swap out the traditional Oreo base for chocolate chip cookies or golden Oreos. These alternatives create a milder flavor profile while maintaining great texture.
For intense chocolate lovers, sprinkle mini chocolate chips between layers.
You can also fold them into your cream cheese mixture. This creates delightful pockets of chocolatey goodness throughout your dessert.
Creative Garnishing Ideas for a Stunning Presentation
Elevate your dessert with sophisticated toppings. Consider sea salt flakes to enhance the chocolate flavor.
Fresh mint leaves add a refreshing contrast.
Crushed candy bars like Snickers or Butterfinger provide exciting texture. Toffee crumbles offer irresistible crunch.
Fresh berries like strawberries or raspberries add color and cut through the richness.
Match your garnishes to the occasion. Use themed sprinkles for holidays or celebrations.
A drizzle of caramel sauce alongside chocolate syrup creates visual appeal. These finishing touches make your creation unforgettable.
Serving Suggestions and Storage Techniques
Complete your culinary masterpiece with perfect serving strategies and smart storage solutions.
These final touches ensure your creation shines from presentation to preservation.
Great Pairings and Plating Ideas
Transform your gathering into an Italian feast by serving this treat alongside savory favorites.
Consider zuppa toscana soup or creamy chicken alfredo for a restaurant-quality experience.
For dessert-focused events, pair it with classic tiramisu.
This maintains a cohesive theme while offering guests delightful options. Both combinations create memorable dining moments.
How to Store and Freeze Leftovers Effectively
Proper storage maintains your dessert’s quality.
Place leftovers in an airtight container in your refrigerator. They’ll stay fresh for 3-5 days, though texture is best within 48 hours.
For longer preservation, freezing works beautifully. Wrap your chilled dessert tightly in plastic wrap and foil. It will keep in the freezer for 2-3 months when stored properly.
Thaw frozen portions overnight in the fridge before serving. The pudding layer may soften slightly after freezing, but the flavor remains delicious.
Follow these simple guidelines for optimal results:
- Refrigerate for at least 2 hours before serving (4-6 hours is even better)
- Freeze for 30 minutes before cutting for perfectly defined layers
- Make this recipe up to 24 hours ahead to simplify party preparations
Become the Ultimate Potluck Here
Now you possess all the tools to become the ultimate potluck hero. This incredible dessert combines simplicity with stunning results that will wow any crowd.
Your creation process becomes stress-free with the no-bake approach.
You can prepare this treat ahead of time, making party planning effortless. The recipe works beautifully for both beginners and experienced cooks.
Remember to allow proper chilling time for each creamy layer.
Quality ingredients like real cream cheese and instant pudding mix make a noticeable difference. Don’t rush the setting process for perfect results.
This versatile food adapts to your preferences and occasions. Keep a frozen version ready for unexpected guests.
Your amazing chocolate lasagna will have people requesting the recipe for weeks.
FAQ
Can I make this dessert ahead of time?
Absolutely! This is one of its best features. You can prepare it a day or two in advance. Just keep it covered in your fridge until you’re ready to serve. The flavors actually get better as they meld together.
What can I use instead of Oreos for the crust?
You have several tasty options. Try using graham crackers, chocolate wafer cookies, or even Teddy Grahams. Just crush them up and mix with melted butter, just like the original recipe.
My cream cheese filling is lumpy. How can I fix it?
A> Make sure your cream cheese is at room temperature before you start. This helps it blend smoothly with the sugar and milk. If you still get a few lumps, a quick mix with an electric hand mixer usually does the trick.
How long does it need to set in the refrigerator?
For the best results and clean slices, let it chill for at least 4-6 hours. Overnight is even better. This gives the pudding layer time to firm up and all the layers a chance to set perfectly.
Can I freeze the leftovers?
Yes, you can! Wrap individual slices tightly in plastic wrap or store the whole dish in an airtight container. It will keep in the freezer for up to a month. Thaw it in the fridge for a few hours before enjoying.
What are some fun topping ideas?
A> Get creative! Mini chocolate chips are a classic. You could also add crushed peppermint candies for a holiday twist, a drizzle of caramel sauce, or even fresh berries for a pop of color and flavor.