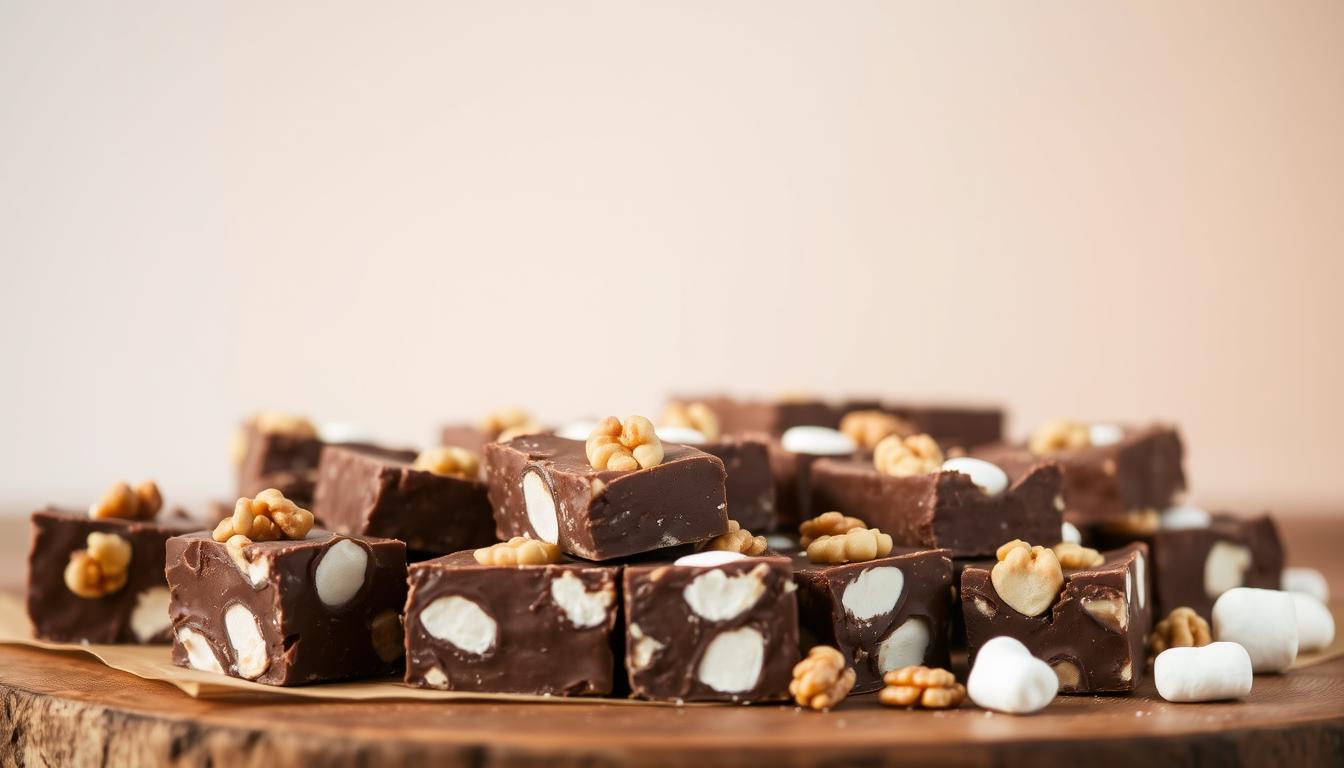
5-Ingredient Rocky Road Fudge (A Quick & Easy Party Sweet)
Want to create a crowd-pleasing dessert that comes together in mere minutes yet tastes like it took hours to make? Then check out our rocky road fudge.
This simple recipe proves that impressive homemade treats don’t require complicated steps or special tools.
You can make this delightful confection without ever turning on your stove. Everything melts together smoothly in the microwave.
The magic lies in just five basic ingredients. You probably have most of them in your kitchen right now.
Think rich semi-sweet chocolate chips, sweetened condensed milk, and a touch of butter.
Then comes the fun part: mixing in miniature marshmallows and salted peanuts.
This combination creates an unforgettable treat. Each bite offers a perfect mix of creamy, crunchy, and chewy textures.
It balances sweet and salty flavors that everyone will love.
The best part? After a few minutes of active work, you just pop it in the fridge to set.
It’s the perfect solution for last-minute parties, holiday gifts, or a simple chocolate craving.
So, ready to get started?
Let’s do this!
Key Takeaways
- This dessert captures the flavors of classic rocky road in a simple, no-bake form.
- The preparation process is incredibly fast.
- You only need five common ingredients to make this rich and decadent treat.
- No special equipment like a candy thermometer or stovetop is necessary.
- The final product delivers a satisfying mix of creamy, crunchy, and chewy textures.
- It’s an ideal choice for busy schedules, parties, or homemade gift-giving.
- This recipe is designed to be foolproof for both beginners and experienced bakers.
No-Bake Rocky Road Fudge (5 Ingredients)
Here’s the recipe to make a 5-ingredient, No-Bake, Rocky Road Fudge that’s perfect for gifting or party trays.
Yield: One 8×8-inch pan
Total Time: 10 minutes prep + 2 hours chilling
Ingredients
Fudge Base
- 3 cups (18 oz / 510 g) semi-sweet chocolate chips
- 1 can (14 oz / 396 g) sweetened condensed milk
- 3 tablespoons (42 g) unsalted butter
Mix-Ins
- 1 cup (100 g) chopped nuts
- Use peanuts, walnuts, pecans, or almonds. Your choice.
- 2 cups (100 g) mini marshmallows
Instructions (Step-by-Step)
Prepare the Pan
- Line an 8×8-inch square baking pan with parchment paper.
- Leave overhang on two sides to lift the fudge out easily later.
Melt the Fudge Base
- Add chocolate chips, sweetened condensed milk, and butter to a medium saucepan.
- Place over low heat, stirring constantly until fully melted and smooth.
- Do not overheat—remove from heat as soon as everything is just melted.
Fold in the Mix-Ins
- Let the chocolate mixture cool 2–3 minutes so it doesn’t melt the marshmallows.
- Stir in:
- 1 cup chopped nuts
- 2 cups mini marshmallows
- Mix just until evenly combined.
Spread and Chill
- Pour the rocky road mixture into the prepared baking pan.
- Smooth the top with a spatula.
- Refrigerate for 2–3 hours, or until completely firm.
Slice & Serve
- Lift the fudge out using the parchment overhang.
- Cut into 1–1.5 inch squares using a sharp knife.
- Store in an airtight container:
- Up to 1 week in the fridge
- Up to 2–3 months in the freezer

Delicious Simplicity of This Fudge Recipe
Many people have fond memories of enjoying classic flavor combinations at summer events and gatherings.
This particular treat captures that same joyful experience in an easy-to-make form.
The method stands out because it skips complicated candy-making steps. You don’t need special tools or years of practice.
This approach makes professional results accessible to everyone.
Why You’ll Love This 5-Ingredient Treat
You’ll appreciate how quickly this dessert comes together. The active preparation time is surprisingly short. Yet the final product looks and tastes impressive.
The texture combination creates a wonderful eating experience. Smooth chocolate meets crunchy nuts and soft marshmallows.
Each bite offers something different for your senses.
The Inspiration Behind Rocky Road Fudge
This flavor combination has international appeal under various names. It appears in different dessert forms around the world.
The balance of sweet and salty elements creates universal enjoyment.
Many remember this taste from childhood ice cream parlors and county fairs. Now you can recreate those memories in your own kitchen.
The recipe serves as a foundation for exploring other variations too.
Essential Raw Materials and Clever Substitutions
Each element in this recipe plays a specific role in achieving the ideal texture and flavor balance.
Understanding these components helps you create perfect results every time.
Traditional Ingredients and Their Roles
Semi-sweet chocolate chips form the rich foundation of your dessert. They provide the perfect sweetness level without overwhelming your palate.
Sweetened condensed milk is the magical ingredient that makes this recipe work. Its high sugar content creates the smooth consistency that sets properly.
Never substitute evaporated milk or cream, as they lack the necessary sugar.
| Ingredient | Primary Function | Quantity | Smart Substitutions |
|---|---|---|---|
| Chocolate chips | Base flavor and structure | 2 cups | Chopped chocolate bars |
| Sweetened condensed milk | Sweetness and binding | 14 oz can | None – essential |
| Butter | Creaminess and shine | ¼ cup | Margarine (less flavor) |
| Vanilla extract | Flavor enhancement | 1 teaspoon | Almond extract |
Nut Options and Alternative Flavors
Salted peanuts deliver the classic taste everyone loves. If you prefer different nuts, walnuts or almonds work beautifully.
Always choose salted varieties for that perfect sweet-salty contrast.
Refrigerate your marshmallows before mixing to prevent melting. If you only have large marshmallows, simply cut them into smaller pieces.
This ensures even distribution throughout your creation.

Preparation Process
The method you choose for melting your ingredients can make all the difference in your final result. Both approaches work beautifully, but each has unique advantages.
Microwave vs. Double Boiler Methods
For the microwave technique, combine three cups of chocolate chips with sweetened condensed milk and butter in a glass bowl.
Heat for 90 seconds at 70% power. This gentle approach helps melt chocolate evenly without scorching.
Stir the mixture well, letting residual heat finish the melting process. If needed, add 15-30 more seconds.
The double boiler method uses indirect heat from simmering water. Place your bowl over a saucepan, ensuring it doesn’t touch the water.
Mixing Techniques for a Smooth Fudge
Proper stirring creates that signature glossy texture. Use a spatula to gently fold ingredients together.
Avoid vigorous mixing that can incorporate air bubbles.
The chocolate mixture should be completely smooth before adding other components. Take your time during these crucial minutes.
Gentle, consistent motion ensures everything blends perfectly.
Watch for a silky consistency with no graininess. This indicates your ingredients have properly emulsified. The result will be a perfectly set dessert every time.

Chilling, Slicing, and Serving Your Fudge
After mixing your ingredients, the cooling process transforms your creation into the firm, sliceable confection you’ve been waiting for.
This final stage ensures your dessert achieves the perfect consistency for serving.
Achieving the Perfect Texture
Place your prepared pan in the refrigerator for approximately four hours.
This chilling time allows the mixture to set completely. The edges will feel firm when gently pressed.
Testing for doneness is simple. Press the surface lightly with your finger. If it springs back without leaving an impression, your dessert is ready.
The corners typically set first.
| Chilling Method | Time Required | Texture Result | Testing Technique |
|---|---|---|---|
| Refrigerator | 3-4 hours | Firm yet creamy | Surface spring-back test |
| Freezer (quick set) | 1-2 hours | Slightly harder | Edge firmness check |
| Countertop (room temp) | 6-8 hours | Softer texture | Finger indent test |
Creative Presentation and Serving Ideas
Remove your creation from the pan using the parchment paper overhang. This technique preserves clean edges.
Slice into one-inch squares using a warm knife.
For special occasions, press additional toppings into the surface before chilling. Holiday sprinkles or extra nuts add festive flair.
Arrange your squares on a decorative platter.
This rich treat pairs wonderfully with cold milk or coffee. Smaller squares work well for portion control.
Larger pieces satisfy bigger appetites.
Storing and Preserving Your Fudge
Learning the right storage methods means you can enjoy your sweet creation whenever the craving strikes.
Proper preservation keeps your dessert fresh and delicious for weeks.
Best Practices for Refrigeration
Store your sliced confection in an airtight container in the refrigerator. This method preserves freshness for 2-3 weeks.
The high sugar and fat content naturally extends shelf life.
Use wax or parchment paper between layers. This prevents pieces from sticking together. Separate different flavors to avoid taste transfer.
Freezer Storage for Long-Term Enjoyment
For longer storage, freeze your dessert for up to two months. This is perfect for holiday preparation.
You’ll always have treats ready for unexpected guests.
Thaw frozen pieces in the refrigerator overnight. This prevents condensation issues. Your confection will maintain perfect texture and appearance.
Having a well-stocked fridge or freezer solves last-minute gift needs. Simply package squares in decorative boxes with ribbon.
Homemade treats make thoughtful presents for any occasion.
Innovative Twists and Party-Ready Variations
Customizing your confection for special events becomes effortless when you explore the endless variation possibilities.
The basic chocolate foundation serves as a perfect canvas for creative expression.
Seasonal Flavors and Decorative Toppings
Transform your dessert for any holiday with simple touches. Use red and green sprinkles for Christmas or pastel colors for spring celebrations.
Colored marshmallows create visual excitement for themed parties. Try pink and blue mini marshmallows for baby showers or rainbow varieties for birthdays.
Experiment with different nuts to change the flavor profile. Almonds add sophisticated crunch while pecans offer buttery richness.
Mixed nuts create complex taste experiences.
Enhance your creation with flavor additions like peppermint extract for winter or orange zest for citrus notes.
A teaspoon of instant coffee powder creates delicious mocha variation.
This approach connects to other rocky road treats like clusters and no-bake cheesecakes.
Your party buffet can feature multiple variations for guests to enjoy.
Make a Timeless Treat with Confidence.
The barrier between store-bought sweets and homemade delicacies has officially been dismantled.
You now have everything needed to create this timeless treat with confidence.
This approach proves that impressive results don’t require complex methods. Your kitchen can produce professional-quality confections using simple techniques.
Feel empowered to experiment with different nuts and festive toppings. The basic formula welcomes your personal creative touches for any occasion.
Remember that proper storage lets you enjoy your creations for weeks. Your freezer becomes a treasure chest of ready-to-share gifts.
We’d love to hear about your kitchen adventures. Share your results and explore other easy recipes to build your dessert repertoire.
FAQ
Can I use a different type of chocolate for this recipe?
Absolutely! Semi-sweet chocolate chips are classic, but you can experiment. Milk chocolate will make a sweeter treat, while dark chocolate creates a richer, less sweet version. Just make sure you’re using good quality chocolate for the best flavor and texture.
What can I use if I don’t have sweetened condensed milk?
Sweetened condensed milk is key for the creamy, firm texture. A direct substitute is challenging, but you can try an equal amount of canned coconut cream mixed with sugar, though the final result may be softer. For best results, stick with the original ingredient.
My fudge is too soft. How can I fix it?
A soft batch usually needs more chilling time. Pop it back in the fridge for a few more hours. For future batches, ensure you’re using the full amount of chocolate chips and that you allow the mixture to cool slightly before stirring in the marshmallows and nuts to prevent them from melting.
How long will this dessert keep fresh?
When stored correctly in an airtight container in the refrigerator, your homemade confection will stay fresh and delicious for up to two weeks. You can also freeze it for up to three months for long-term enjoyment.
Can I make this treat without nuts?
Of course! Simply leave out the walnuts or peanuts. The mini marshmallows provide plenty of that classic texture. You could also add in extras like crushed pretzels or dried fruit for a different twist.
Is the microwave or stovetop method better?
Both work well! The microwave is faster and easier for cleanup. The double boiler method on the stovetop gives you more control to prevent scorching the chocolate. Choose the method you’re most comfortable with for melting your chocolate chips smoothly.