Easy 3-Ingredient Oreo Cookie Truffles (A Last-Minute Party Saver)
Want to make a hallmark dessert in half an hour and virtually no effort? Then you’re in the right place. Check out our Oreo cookie truffles made with just 3 ingredients.
Imagine transforming a simple package of cookies into elegant, bite-sized delights that look like they came from a professional chocolatier.
This dream is completely achievable. You are about to discover the ultimate party-saving secret.
Whether a last-minute invitation pops up or you need a quick contribution for a potluck, this solution is your answer.
The process is incredibly simple, requiring just three basic items you might already have in your pantry.
Even if you have never made candy before, you will achieve beautiful, delicious results on your very first try.
This guide will walk you through the entire process, from the basic steps to creative twists and presentation tips that will have everyone asking for your recipe.
Ready to dive in?
Let’s go!
Key Takeaways
- Create an impressive dessert using only three simple ingredients.
- Prepare these delightful treats in half an hour, perfect for unexpected events.
- Achieve professional-looking results even as a beginner with this no-bake method.
- Learn easy variations to customize the flavor for any occasion.
- Master simple presentation techniques to make your dessert star at any gathering.
- This foolproof recipe is ideal for holidays, birthdays, and potlucks.
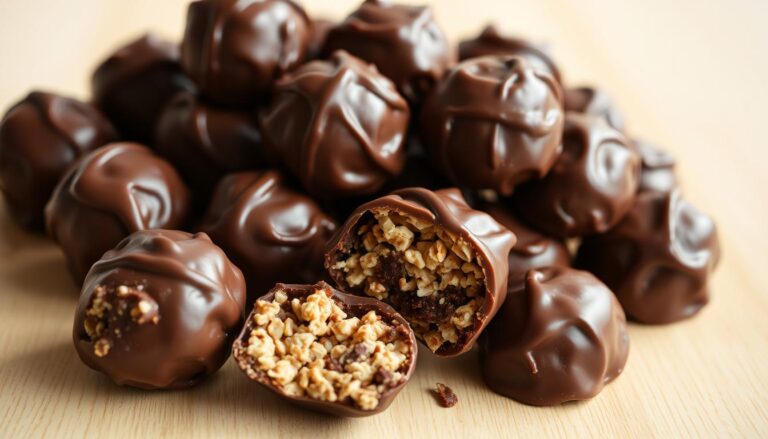
Oreo Cookie Truffles (3 Ingredients)
Here is the recipe for Oreo Cookie Truffles. These are the perfect, elegant, 3-ingredient treat for any great party, including New Year’s Eve celebration.
Yield: About 30 truffles (1-inch)
Ingredients
- 36 Oreo cookies (1 standard 14.3-oz / 405 g package)
- 8 oz (226 g) full-fat cream cheese, softened to room temperature
- 12 oz (340 g) chocolate coating
- Use melting wafers, almond bark, or high-quality baking chocolate (dark, milk, or white)
Instructions
Prepare the Oreo Base
- Place all 36 Oreo cookies (filling included) in a food processor.
- Process until you have fine, even crumbs. About 20–30 seconds.
- If you don’t have a food processor, seal cookies in a zip-top bag and crush with a rolling pin until very fine.
Make the Truffle Mixture
- Transfer Oreo crumbs to a mixing bowl.
- Add 8 oz softened cream cheese.
- Use a spatula or hand mixer on low speed to blend until a thick, uniform dough forms.
- No streaks of cream cheese should remain.
Shape the Truffles
- Line a baking sheet with parchment paper.
- Scoop and roll the mixture into 1-inch balls (about 1 tablespoon each).
- Arrange on the baking sheet and freeze for 15–20 minutes to firm up.
4. Melt the Chocolate Coating
- Place 12 oz chocolate coating in a microwave-safe bowl.
- Microwave in 20–30 second bursts, stirring each time, until fully smooth.
- Do not overheat.
- If the chocolate seems too thick, add ½ teaspoon neutral oil.
5. Dip the Truffles
- Remove chilled truffle balls from the freezer.
- Using a fork, dip each ball into the melted chocolate, letting excess drip off.
- Place dipped truffles back onto parchment.
Optional Decorations
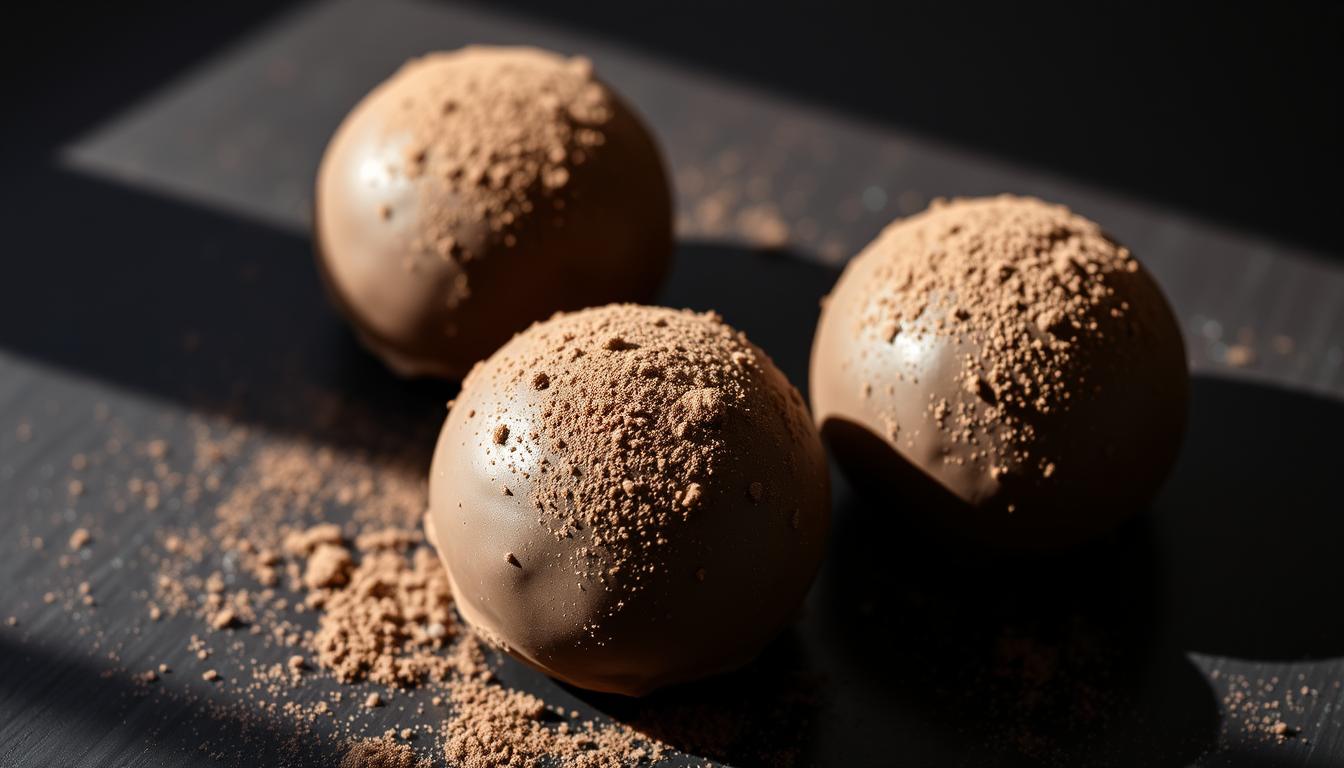
- Sprinkle with crushed Oreo crumbs before the chocolate sets.
- Drizzle contrasting melted chocolate (white on dark, dark on white).
6. Chill and Serve
- Refrigerate truffles for 20–25 minutes, or until the chocolate is fully set.
- Serve chilled or at cool room temperature.
Storage
- Refrigerator: Up to 1 week in an airtight container.
- Freezer: Up to 2 months; thaw in the fridge before serving.

Introduction to Oreo Cookie Truffles
The beauty of this approach lies in transforming everyday pantry staples into something truly extraordinary with minimal effort.
These bite-sized confections combine simple ingredients to create a dessert that feels both indulgent and effortless.
Why You’ll Love This Recipe
You’ll appreciate how this method delivers incredible flavor with just three basic components.
The magic happens when crushed cookies blend with creamy cheese to form a rich base.
This combination creates a texture that’s simultaneously velvety and satisfying. The final chocolate coating adds that professional touch everyone admires.
Even without baking experience, you can achieve stunning results.
The process is straightforward and forgiving, making it perfect for kitchen newcomers and experts alike.
The Perfect Party Saver
When unexpected events arise, these oreo balls become your go-to solution. They come together in about thirty minutes from start to finish.
Your guests will be amazed by the elegant appearance of these chocolate-covered treats. They consistently disappear faster than other desserts at gatherings.
The simplicity of this recipe means you can focus on enjoying your event rather than stressing over complicated preparations.
It’s the ideal solution for last-minute invitations or potluck contributions.
Raw Materials You’ll Need
Your shopping list for this recipe couldn’t be simpler, requiring just three main components.
These basic items work together to create the magic.
| Ingredient | Quantity | Purpose | Important Notes |
|---|---|---|---|
| Original Sandwich Cookies | 1 package (36 cookies) | Base flavor and texture | Use standard filling, not double-stuffed |
| Cream Cheese | 8 oz block | Binding agent | Softened to room temperature |
| Chocolate Coating | 16 oz | Professional finish | Melts or baking chocolate work well |
Essential Components
Start with one standard package of the famous sandwich cookies. The original variety gives the perfect texture. You’ll need all 36 cookies from the 14.3-ounce package.
The cream cheese binds everything together beautifully. Use one full 8-ounce block softened at room temperature. This ensures smooth mixing.
For coating, choose your favorite chocolate type. You need about 12 ounces total. Candy melts or baking chocolate both work wonderfully.
Optional Toppings and Flavor Enhancers
Customize your creations with simple additions. Crush a few extra cookies for a classic garnish. Sprinkles add color for special occasions.
Chopped nuts or candy pieces provide extra texture. These optional ingredients let you personalize each batch. They make your treats unique.
Essential Kitchen Tools & Prep Tips
Having your kitchen tools ready is the first step toward creating perfect bite-sized desserts.
The right equipment makes the process smooth and ensures professional results every time.
What You Need: Bowls, Parchment Paper, and Freezing Tools
You’ll need a large mixing bowl for combining your ingredients. A separate heat-safe bowl works best for melting chocolate coatings.
Line your baking sheet with parchment paper to prevent sticking. This makes cleanup simple and keeps your treats intact.
A small cookie scoop creates uniform balls that look professional. After forming your desserts, chill them in the freezer for 15-30 minutes.
This helps them hold their shape during the final coating step.
How to Crush Oreos to Fine Crumbs
Getting the right consistency starts with transforming whole cookies into fine particles.
This step creates the foundation for your dessert’s texture. Proper crushing ensures your final product holds together beautifully.
You have two excellent methods for creating the perfect base. Both approaches yield excellent results for your confections.
Food Processor Technique
Using a kitchen appliance provides the fastest path to uniform texture. Place all 36 whole cookies directly into the bowl. The cream filling stays with the biscuits.
Pulse in short bursts rather than continuous processing. This prevents overworking the mixture. Stop when you achieve sand-like consistency.
| Method | Time Required | Equipment Needed | Best For |
|---|---|---|---|
| Food Processor | 2-3 minutes | Electric appliance | Quick preparation |
| Manual Crushing | 5-7 minutes | Bag and rolling pin | Hands-on control |
Hand Crushing Options for Beginners
The manual approach gives you complete texture control. Use a heavy-duty resealable bag to contain the mess. Remove excess air before sealing tightly.
Systematically crush with a rolling pin or heavy pan. Check frequently for large chunks. The finished particles should feel like coarse sand between your fingers.
Both methods create the perfect base for your delicious creations. The fine texture ensures your dessert balls have professional quality.
Mixing Ingredients for Perfect Consistency
This step is where your ingredients transform into the base for your dessert. Achieving the right texture is crucial for creating treats that hold their shape beautifully.
Your goal is a uniform, dough-like consistency that feels smooth and holds together perfectly.
Combining Oreos and Cream Cheese
Once your cookies are finely crushed, add the entire 8-ounce block of softened cream cheese.
If using a food processor, pulse in short bursts. Stop to scrape the sides of the bowl often.
This ensures the cream cheese and crumbs blend evenly without over-mixing. Room-temperature cream cheese is essential.
Cold cheese creates lumps, while softened cheese blends smoothly.
Aiming for a Smooth Mixture
You’ll know the mixture is ready when it forms a cohesive mass. It should hold together when pressed, with no dry crumbs or streaks of plain cream cheese visible.
If mixing by hand, use a sturdy spoon to press and fold the ingredients. The final texture should be slightly sticky but easy to scoop.
- Avoid over-processing, which can make the mixture too soft.
- If the blend seems too soft, refrigerate it for about an hour before rolling.
- This firms it up, making it easier to form uniform balls.
Step-by-Step Directions for Oreo Cookie Truffles
Now comes the exciting part where you shape your mixture into perfect spheres ready for their chocolate coating.
This process transforms your creamy blend into elegant treats that look professionally made.
Following these simple steps ensures your dessert balls maintain their shape and get that beautiful chocolate finish.
The technique is straightforward but makes all the difference in your final presentation.
Forming the Oreo Balls
Begin by lining your baking sheet with parchment paper. This creates a non-stick surface that prevents sticking during both stages of preparation.
Use a one-tablespoon scoop to portion your mixture consistently. Roll each portion between your palms to create smooth, round balls about one inch in diameter.
Work quickly to prevent the mixture from warming in your hands. Place all formed balls on your prepared sheet with some space between them.
Freezing and Dipping in Melted Chocolate
Transfer your baking sheet to the freezer for 15-30 minutes. This chilling step helps the balls hold their shape during dipping.
Remove them from the freezer and work promptly. Dip each ball completely in your melted chocolate using forks or dipping tools.
Tap gently to remove excess coating. Return each treat to the baking sheet. Add toppings immediately before the chocolate sets.
Allow your finished truffles to sit at room temperature for 15-20 minutes. The chocolate will become firm to the touch.
Your delicious creations are now ready to enjoy or store.
Tips for Melting and Dipping Chocolate
Mastering the art of chocolate coating can make the difference between good treats and exceptional ones.
The right technique ensures a smooth, professional finish that impresses everyone.
You have two excellent methods for preparing your chocolate coating. Each approach has distinct advantages depending on your kitchen setup and time constraints.
Double Boiler vs. Microwave Methods
The double boiler method provides gentle, even heat that prevents scorching.
Place your chocolate in a heat-safe glass bowl over simmering water. Stir frequently until completely smooth.
For faster results, the microwave method works well too. Heat your chocolate in a microwave-safe bowl for one minute at 50% power.
Stir thoroughly, then continue heating in 20-second intervals.
Both methods yield perfect melted chocolate for dipping. The key is using reduced power to avoid hot spots that can ruin your coating.
Avoiding Temperature Pitfalls
Temperature control is crucial for successful dipping. Never allow water to contact your melted chocolate, as this causes seizing and graininess.
Also avoid coating very cold treats with hot chocolate. This temperature shock can cause cracking. Let your chilled creations sit for a minute before dipping.
The ideal scenario involves chocolate that’s fluid but not steaming hot. This balance prevents cracking while maintaining perfect shape.

Creative Variations and Flavor Additions
The real fun begins when you start experimenting with different flavor combinations and coatings.
Your basic recipe serves as a perfect canvas for creating seasonal specialties and personalized treats that wow your guests.
Peppermint Oreo Truffles for the Holidays
Transform your dessert into festive peppermint treats perfect for Christmas gatherings.
Add ½ to 1½ teaspoons of pure peppermint extract to your softened cream cheese before mixing in the cookie crumbs.
After dipping your peppermint-flavored creations in chocolate, immediately sprinkle with crushed candy canes or peppermint bits.
The crunchy candy adds beautiful holiday color and extra minty freshness.
Using Different Types of Chocolate
Experiment with various chocolate coatings to discover your favorite combinations.
White chocolate creates a clean, elegant appearance that shows off colorful toppings beautifully.
Milk chocolate adds creamy sweetness, while dark chocolate provides sophisticated depth.
For best results, use melting wafers or baking chocolate rather than chocolate chips.
Try Golden cookies instead of chocolate ones for a completely different flavor profile.
Remember to reduce your cream cheese to 7 ounces since vanilla cookies have slightly more filling.
Get creative with other extracts like almond, orange, or even coffee liqueur. Match your toppings to different occasions using seasonal sprinkles or elegant dusts.
Storing and Serving Your Oreo Cookie Truffles
Proper storage ensures your delightful creations stay fresh and delicious for every occasion.
Knowing how to keep them and present them beautifully maximizes your effort.
This guide covers simple methods to preserve their quality. You will also find ideas to make them the star of any gathering.
Refrigeration and Freezing Guidelines
Because of the cream cheese, these treats need refrigeration. Always keep them in an airtight container in the refrigerator.
They will stay fresh this way for up to two weeks. This makes them a perfect make-ahead dessert.
For longer storage, the freezer is your friend. Place the truffles in a single layer in an airtight container.
Use parchment paper between layers to prevent sticking. They can be frozen for up to three months.
When ready to serve, thaw them in the refrigerator overnight. This prevents condensation on the chocolate coating.
Presentation and Serving Ideas
When serving, your truffles can sit out at room temperature. A two-hour window is safe and usually sufficient for any event.
For a beautiful display, use paper candy cups on a platter. Decorative boxes or clear cellophane bags make wonderful gifts.
Pair these bites with coffee for an adult gathering. For a family event, cold milk is the perfect companion.

Troubleshooting Common Issues
Even the simplest recipes can have small hiccups, but every issue has an easy fix. Let’s tackle the most frequent challenges you might face.
Understanding why problems occur is the first step to perfecting your technique. A little knowledge ensures your treats turn out beautifully every time.
Fixing Texture and Consistency Problems
Your base mixture is the foundation of your dessert. If it’s too soft, the balls won’t hold their shape. Simply chill the mixture for an hour to firm it up.
If the blend feels dry and crumbly, it needs more moisture. Add a tablespoon of cream cheese at a time until it becomes cohesive.
Overmixing can create a paste-like texture. Pulse your ingredients just until combined for the best results.
- Chill a soft mixture to make rolling easier.
- Add small amounts of cream cheese to fix a dry, crumbly base.
- Avoid over-processing to prevent a paste-like consistency.
Preventing Cracks and Overmixing
Cracking often happens due to temperature shock. If your formed balls are very cold and the chocolate coating is very hot, the center expands and cracks the shell.
Let your chilled creations sit at room temperature for a minute or two before dipping. Ensure your melted chocolate is fluid but not steaming hot.
Special varieties with extra filling can alter your ratios. For these, reduce the cream cheese slightly to maintain the perfect consistency for your oreo truffles.
3-Ingredient Baker Quality Desserts
You now possess all the knowledge to create stunning, bakery-quality desserts with just three simple ingredients.
This approach proves that impressive results don’t require complex techniques or hard-to-find items.
Whether you make the classic version or try creative variations, these delightful treats adapt to any event.
Their reliability is a key part of their charm, working perfectly when you follow the essential tips.
Remember the core advice for success: proper ingredient temperature and correct storage.
Your finished creations make wonderful gifts and are perfect for any party or potluck.
Now that you’ve mastered this foundational recipe, feel confident to experiment and make it your own.
Go ahead and prepare a batch today. You’ll love how these simple bites bring so much joy.
Enjoy!
FAQ
Can I make these truffles without a food processor?
Absolutely! You can place the cookies in a sturdy zip-top bag and crush them with a rolling pin. It might take a little more effort, but you’ll still get the fine crumbs you need for the perfect mixture.
Why is my cream cheese mixture so sticky?
If your mixture is too sticky to roll, it likely needs more time in the refrigerator. Chill the bowl for about 20 minutes to firm it up. Using cream cheese that is at room temperature, not softened, can also help prevent this issue.
What’s the best way to melt the chocolate for dipping?
For smooth, glossy results, use a double boiler. If you’re short on time, the microwave works too! Just heat it in short bursts, stirring frequently to avoid overheating and seizing the candy coating.
How long can I store these sweet treats?
Keep them in an airtight container in the refrigerator for up to a week. For longer storage, you can freeze them for up to three months. Just be sure to separate layers with parchment paper.
Can I use different types of cookies or chocolate?
Yes, get creative! Try using mint or peanut butter cookies for a new flavor. You can also dip your balls in white, dark, or milk chocolate, and even add sprinkles or crushed candy on top for a festive look.
My chocolate coating cracked after dipping. What happened?
This usually occurs if the frozen centers are too cold when dipped, causing the chocolate to contract and crack. Let the balls sit at room temperature for just a minute or two before coating to allow a slight temperature adjustment.