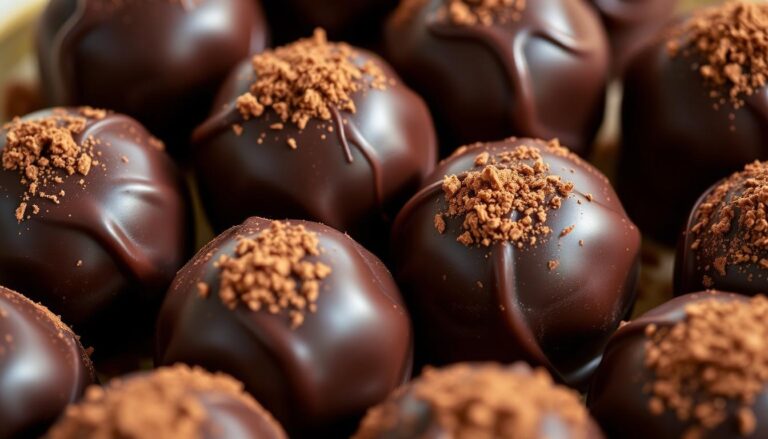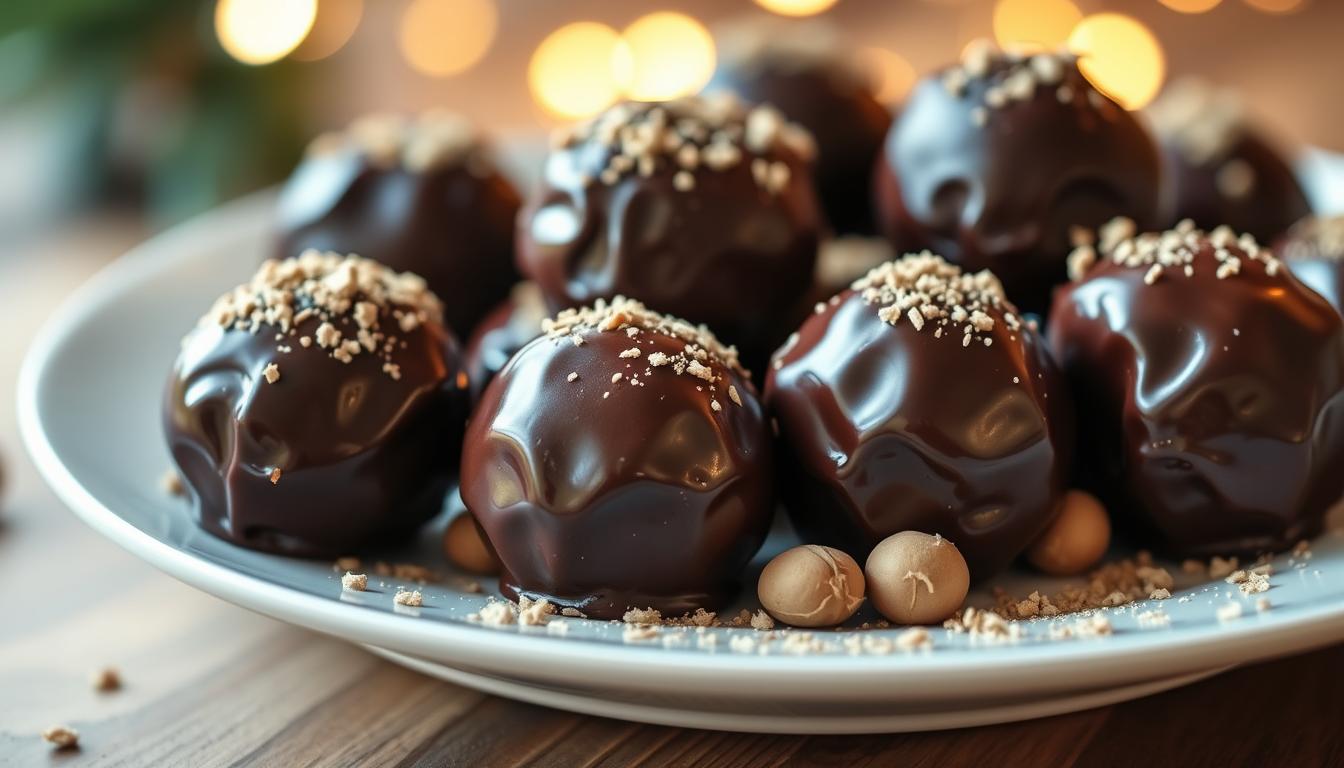
Dark Chocolate Rum Balls (An Easy No-Bake NYE Treat)
Want to create a crowd-pleasing dessert that combines an intense, rich flavor with a delightful boozy kick? Then these dark chocolate rum balls are exactly what you need.
The best part is that you don’t even have to walk near an oven to make this no-bake holiday treat.
The final product has a fudgy, truffle-like texture. The deep, decadent notes are perfectly balanced.
This recipe yields plenty to share at parties or give as gifts. You can also keep a stash for personal indulgence.
The beauty lies in their versatility. You can coat them in shredded coconut or roll them in cocoa powder.
Feel free to get creative with various toppings to suit your taste.
Key Takeaways
- A simple, no-bake dessert perfect for holiday celebrations.
- Requires only six basic ingredients and no oven time.
- Offers a rich, fudgy texture with a balanced, sophisticated flavor.
- Yields approximately 30-36 bite-sized treats for sharing or gifting.
- Highly versatile with options for different coatings and toppings.
- Naturally adaptable to be vegan and dairy-free.
- An impressive homemade treat for after-dinner enjoyment or as a gift.
Making Decadent Dark Chocolate Rum Balls
Here is the recipe for making no-bake Dark Chocolate Rum Balls that are rich, and fudgy.
A holiday treat that’s perfect for Christmas trays and New Year’s Eve celebrations.
Yields: 24 – 28 balls.
Ingredients
Dry Base
- 2 cups (200g) graham cracker crumbs
- 1 cup (120g) finely chopped nuts (walnuts or pecans work best)
- ½ cup (50g) unsweetened cocoa powder
Chocolate & Sweeteners
- 6 oz (170g) bittersweet chocolate, finely chopped
- ½ cup (100g) granulated sugar
Wet Ingredients
- 4 tbsp (56g) unsalted butter, melted
- ⅓ cup (80ml) dark rum (Gosling’s Black Seal recommended)
- For stronger rum flavor: increase to ½ cup (120ml)
For Rolling
- Additional unsweetened cocoa powder, powdered sugar, or finely crushed nuts
Instructions
Prepare the Chocolate Base
- Add the finely chopped bittersweet chocolate to a microwave-safe bowl.
- Microwave in 20–30 second bursts, stirring between each, until just melted and smooth.
- Set aside to cool slightly (warm, not hot).
Combine Dry Ingredients
- In a large mixing bowl, combine:
- Graham cracker crumbs
- Finely chopped nuts
- Unsweetened cocoa powder
- Granulated sugar
- Whisk to evenly disperse ingredients.
Add the Wet Ingredients
- Pour in the melted butter and dark rum.
- Add the melted bittersweet chocolate.
- Stir using a silicone spatula until a thick, dough-like mixture forms.
- If mixture is too crumbly, add 1–2 tbsp additional rum or a splash of water.
- If too sticky, add 1–2 tbsp additional graham crumbs.
Chill the Mixture
- Cover the bowl and refrigerate for 20–30 minutes, just until firm enough to roll.
Shape the Rum Balls
- Using a small cookie scoop or tablespoon, scoop portions of the chilled mixture.
- Roll each portion between your palms into a smooth ball.
- Coat each rum ball in your preferred finishing layer:
- Unsweetened cocoa powder (most traditional)
- Powdered sugar
- Crushed nuts
- Chocolate sprinkles
Rest for Best Flavor
- Refrigerate the finished rum balls for at least 24 hours.
- This allows the rum flavor to deepen and mellow into the chocolate.
Storage
- Refrigerate in an airtight container for up to 2 weeks.
- Freeze for up to 3 months; thaw in the fridge before serving.

Introduction to a Festive New Year’s Treat
The holiday season brings a special kind of magic to our kitchens and our tables.
December is filled with lights, traditions, and, of course, incredible food.
Among the most beloved indulgences are fudgy, rich confections that feel both nostalgic and celebratory.
Why You’ll Love This No-Bake Recipe
You will appreciate how this recipe saves precious time. When your oven is busy with other dishes, these treats come together effortlessly.
They require minimal hands-on work, using simple tools to create something impressive.
The no-bake nature is a true lifesaver during a bustling season. You can prepare them well in advance. Their flavor even improves as they rest, making your planning easier.
Setting the Holiday Mood
This particular food has deep roots in traditional celebrations. Serving these little morsels instantly creates a warm, festive atmosphere.
They are perfect for adult gatherings, offering a sophisticated flavor profile.
The combination of ingredients creates that perfect holiday taste. It feels special and nostalgic.
Whether for a family party or an elegant soirée, these treats help create lasting memories.
Related: Make Dark Chocolate Champagne Truffles.
Ingredients Overview and Must-Have Equipment
Your pantry likely holds most of what you need for this effortless, no-bake holiday favorite.
Understanding each component ensures your treats turn out perfectly every time.
Essential Components and Their Roles
The foundation is your cookie base. You can use digestive biscuits, graham crackers, or Nilla wafers. These create the crumb structure.
Quality bittersweet chocolate varieties provide a deep, rich flavor. A good cup of a spirit like Gosling’s adds the signature kick. Unsweetened cocoa powder intensifies the taste.
Other key items bind everything together. You will need melted butter, a bit of sugar, and sometimes nuts or coconut. Each adds moisture and texture.
Kitchen Tools for a Smooth Process
A food processor is your best friend for this recipe. It quickly turns cookies and nuts into fine, even crumbs. This is crucial for the right consistency.
You will also need a large bowl for mixing. A rubber spatula helps combine everything smoothly. A small cookie scoop makes forming the treats easy and uniform.
Having parchment paper ready keeps your workspace clean. These simple tools make the entire process a breeze.

Mastering Dark Chocolate Rum Balls Techniques
Understanding how your mixture transforms during preparation ensures consistent results every time. The texture evolution is fascinating to observe.
Mixing and Forming the Perfect Dough
Your mixture will feel quite sticky and soft when first combined. This is completely normal. Don’t worry if it seems too wet initially.
The resting period is crucial for perfect texture. Let your mixture sit uncovered for about 4 hours.
You can also cover it lightly overnight. This allows the flavors to meld beautifully.
Knead the dough briefly before the resting time. Just 15-30 seconds helps distribute ingredients evenly. This ensures every bite has consistent flavor.
When ready to form your treats, work with slightly damp hands. This prevents excessive sticking. Keep a small bowl of water nearby to rinse hands periodically.
| Dough Condition | Appearance | Solution |
|---|---|---|
| Too Sticky | Wet, hard to handle | Add more crushed cookies |
| Too Dry | Cracked, crumbly | Add tablespoon of liquid |
| Perfect | Firm but pliable | Ready for rolling |
Roll each portion between your palms using gentle pressure. Aim for 1 to 1½ inch spheres. This creates the ideal bite-sized portion.
If the mixture cracks, it may need more resting time.
Test-roll one or two first to check consistency. Adjust as needed before completing the entire batch.

Decorating and Coating Variations
The final flourish for your confections comes from the coating you choose.
This step adds visual appeal and an extra layer of flavor. You have two fantastic paths to explore.
One is quick and simple. The other offers a more elegant, professional finish. Both methods yield delicious results.
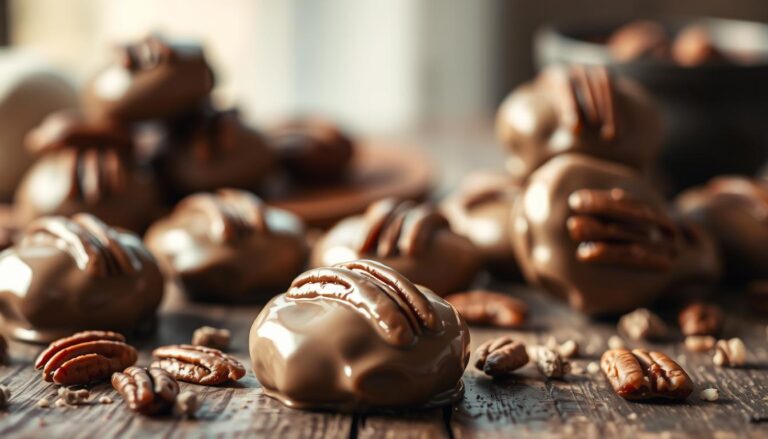
Creative Coating Ideas: Coconut, Cocoa, and More
For a fast and easy option, rolling is your best bet. Place your desired coating in a small bowl.
Finely shredded coconut and unsweetened cocoa powder are classic choices. You can also use confectioners’ sugar or finely chopped nuts.
Gently roll each sphere until it’s fully covered. This method provides a wonderful texture contrast.
For a glossy, sophisticated shell, tempering is the key. This process involves carefully melting your preferred variety.
The “seeding” method ensures a perfect snap and sheen.
Melt two-thirds of your chopped bar until it’s just warm. Then, add the remaining third and stir vigorously.
This cools the mixture to the ideal working temperature.
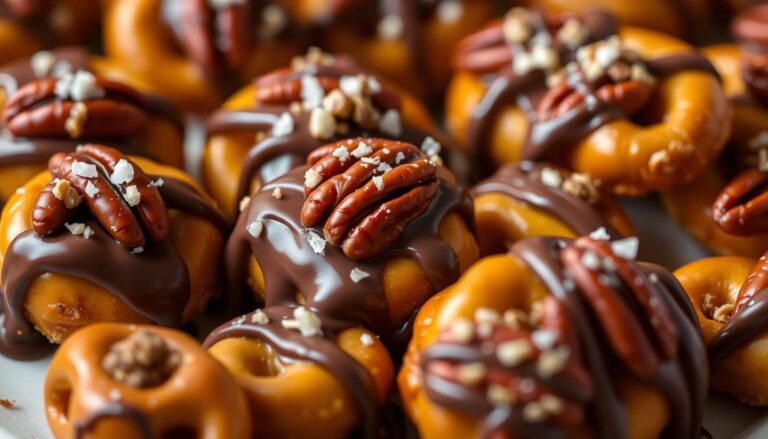
Drizzling and Topping for Extra Flavor
After dipping your treats, you can add toppings while the coating is still wet.
Sprinkle on some chopped pecans or almonds for a crunchy element. A pinch of sea salt can enhance the rich flavor profile beautifully.
For a stunning look, try a drizzle. Once the primary coating sets, melt some white confection.
Use a fork or piping bag to create elegant zig-zags over the top.
Mixing and matching coatings creates a visually exciting platter. This protective layer also helps keep your treats moist and fresh.
Troubleshooting and Texture Tips
Sometimes your dessert mixture doesn’t behave exactly as expected, but don’t worry.
Achieving the perfect consistency is easier than you think with a few simple adjustments.
The texture of your truffle base will feel quite sticky and soft when first mixed. As it cools, it becomes less sticky and may harden slightly while remaining fudgy.
Let your mixture rest uncovered for 4 hours or lightly covered overnight. This resting period at room temperature helps dry out the base without losing flavor.
How to Fix Stiff or Dry Dough
If your mixture feels too stiff or dry and won’t hold together, add more liquid gradually. Start with one tablespoon at a time, mixing thoroughly after each addition.
When your base is too wet and sticky even after resting, incorporate more crushed cookies.
A tablespoon of cocoa powder can also absorb excess moisture.
Consider these quick fixes for common texture issues:
- Cookie choice affects moisture: Graham crackers create drier mixture than sandwich cookies
- Warm kitchens make mixture stickier so refrigerate 15-20 minutes before rolling
- If refrigerated dough becomes too hard, let sit at room temperature for 10-15 minutes
- Cracking during rolling indicates dryness. Warm mixture slightly or add more liquid
The fat content from your ingredients significantly affects texture. If making substitutions, you may need to adjust liquid ratios for proper consistency.
Storage Options and Shelf Life
Knowing how to store your homemade confections properly can make all the difference in their quality and longevity.
The right storage methods ensure your treats stay fresh and delicious.
Proper Refrigeration and Airtight Containers
For short-term storage, your refrigerator is your best friend. Place your treats in an airtight container lined with parchment paper.
This method keeps them fresh for up to two weeks. The parchment prevents sticking between layers. Your fridge maintains the perfect cool temperature.
Many people find the flavor improves after a day or two. The ingredients meld together beautifully. If serving the same day, expect a more intense taste.
Freezing Guidelines for Long-Term Enjoyment
For extended storage, freezing works wonderfully. First, arrange your treats on a parchment-lined baking sheet.
Freeze them for about an hour until solid. Then transfer to a freezer-safe container. They’ll keep beautifully for 2-3 months.
Thaw gradually in the refrigerator before serving. This prevents condensation and maintains texture. Your recipe can be made well ahead of time.
Serving Suggestions for Holiday Gatherings
The way you serve these treats can elevate them from simple sweets to memorable holiday highlights.
These little morsels work beautifully as an elegant after-dinner option for adult parties.
They offer a rich indulgence that satisfies sweet cravings without being overwhelming. The flavor develops beautifully after a day or two of resting.
Presentation Ideas to Impress Your Guests
Arrange your creations on a beautiful platter or tiered dessert stand. Use decorative paper candy cups or mini liners for individual servings.
Group different coating varieties together for visual interest. Some rolled in coconut create a snowy effect. Others dusted with cocoa offer contrast.
For gift-giving, layer them in decorative tins or glass jars with parchment paper. This makes your homemade food feel extra special during the holiday season.
Pairing Your Rum Balls with Beverages
These confections pair wonderfully with strong, hot coffee or espresso. The bitterness balances the sweetness perfectly.
Consider serving them alongside dessert wines, port, or brandy. A cup of hot chocolate creates a delightful double-chocolate experience.
Always label them clearly since they contain alcohol. Keep them away from children as these are adult treats.
An easy, gourmet-style dessert.
You now possess everything needed to craft an unforgettable, gourmet-style dessert with incredible ease.
This no-bake food is the ultimate holiday recipe for impressing guests or treating yourself.
Its simplicity is its greatest strength. With basic ingredients like vanilla wafers, cocoa powder, and a cup of your preferred spirit, you can achieve professional results.
The food processor does the heavy lifting, and a little resting time at room temperature works its magic.
Feel free to get creative with your final coating. A roll in shredded coconut or a dusting of extra powder adds a beautiful finish.
Remember, these decadent treats are for adults only due to their rich flavor profile.
So, gather your sugar, bowl, and other components. In just minutes, you can create a batch of these sophisticated confections that taste even better the next day.
Your holiday celebrations are about to get a whole lot sweeter.
Want to discover another delightful, sweet treat for your New Year’s Eve party?
Then check out our recipe to make White Chocolate Cheesecake Cups with a Boozy Berry Topping.
FAQ
Can I make these treats without a food processor?
Absolutely! If you don’t have a food processor, you can place the vanilla wafers in a sturdy zip-top bag and crush them finely with a rolling pin. Mix everything by hand in a large bowl until well combined.
My mixture is too dry and won’t hold together. What should I do?
If your dough is too crumbly, add a little more liquid. A teaspoon of water, corn syrup, or even an extra splash of your chosen spirit can help bind the ingredients. Add it slowly until the texture is just right.
How long do these no-bake goodies need to chill before serving?
For the best texture and flavor, let them set in the fridge for at least one to two hours. This allows the flavors to meld and the balls to firm up, making them easier to handle and enjoy.
What’s the best way to store them, and how long will they last?
Keep your creations in an airtight container. They will stay fresh in the refrigerator for up to two weeks. For longer storage, you can freeze them for several months.
Can I use a different type of alcohol or make them non-alcoholic?
Yes, you can easily adapt the flavor! Try using bourbon, brandy, or a flavored liqueur. For a non-alcoholic version, substitute the liquor with orange juice, strong coffee, or a flavored syrup.
What are some fun coating variations besides cocoa powder?
Get creative with your coatings! Roll them in shredded coconut, finely chopped nuts, or even colorful sprinkles for a festive look. A drizzle of melted confectionery coating adds a beautiful finish.